Translation of static pages and .mdx files pages in a Gatsby project

Hello! My name is Roman Horbunov, and I am a Front-end developer at Rolique. I often have opportunities to implement crucial things for modern sites and applications. One of them is internationalization and localization or, as we call it, multilingualism.
Creating static sites using the JAMstack architectural approach with javascript frameworks (React, Vue.js) is quite popular today. The prevalent ones are Gatsby.js and Next.js.
Today I`ll focus on implementing multilingualism for the Gatsby project. It has features that, at first glance, may be hard to understand, even for those who are already familiar with the basic capabilities of Gatsby.
This article will be helpful for both those who are getting acquainted with the powers of Gatsby and those who have already used this tool at work.
What are we going to translate?
Gatsby is an excellent tool for creating static sites, which generates static pages during the building process. The user's browser will display such a site with minimal delay.
There are three page-generation modes available in Gatsby:
- SSG (Static Site Generation) — site pages are static and generated in advance, during project assembly;
- SSR (Server Side Rendering) — the page is generated at the moment of the user's request;
- DSG (Deferred Site Rendering) is similar to static rendering, but some static pages are generated only after the user's request (for example, the least visited ones). It saves time during the building.
You can read more about the generation modes in Gatsby on the official website.
Even though this tool is becoming more flexible and allows the creation of different types of projects, the range of translation usage remains constant.
Here are the types of content that may require translation:
1. Static phrases located directly in the code of pages or project components.
2. .md, .mdx files that can be a content source for site pages.
3. Content received from headless CMS or other sources.
In this article, we will focus on the first point. The second point is also interesting to consider, but not today. Regarding the third one, CMS is designed to create content, including multi-language translation.
A CMS is a content management system. Creating Gatsby projects based on CMS data is one of the principles of the JAMstack. The CMS needs to be headless, i.e., able to use the API to provide data describing the content intended for building pages. Nowadays, almost all popular CMS can do this. Follow the link to get acquainted with the complete list of headless CMSs in the JAMstack statistics.
Work with the Gatsby project
Creating a project on Gatsby isn't the article's topic. We will work with an already created and partially configured one. If you need to get a repository with the initial state of the project code, follow the link.
Also, here you can immediately see the result and familiarize yourself with the final code version on GitHub.
After cloning the project and installing all npm dependencies, you will get a simple three-page site, minorly styled with CSS Modules (default supported by Gatsby). Each page will contain several phrases for which translations must be added.
# clone the project repository
git clone github.com/NewRoman/gatsby-tutor
# go to the project directory
cd gatsby—tutor
# install dependencies
npm install
# launch the gatsby project
npm run develop
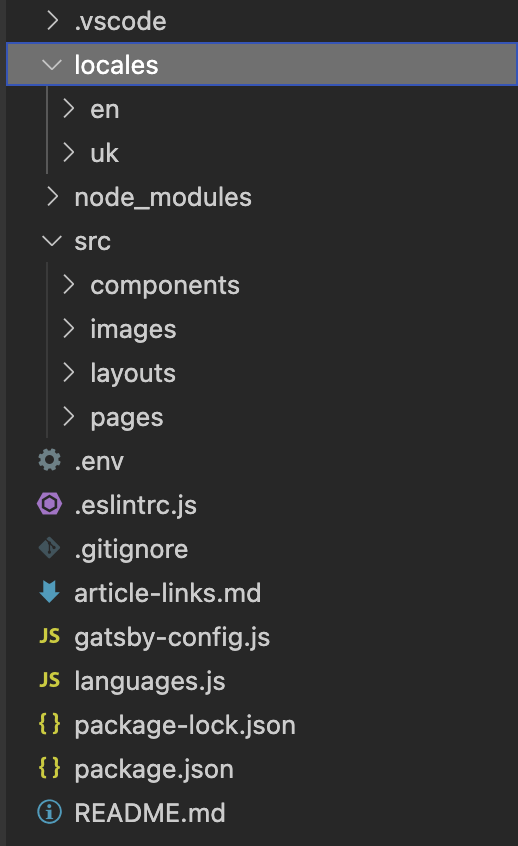
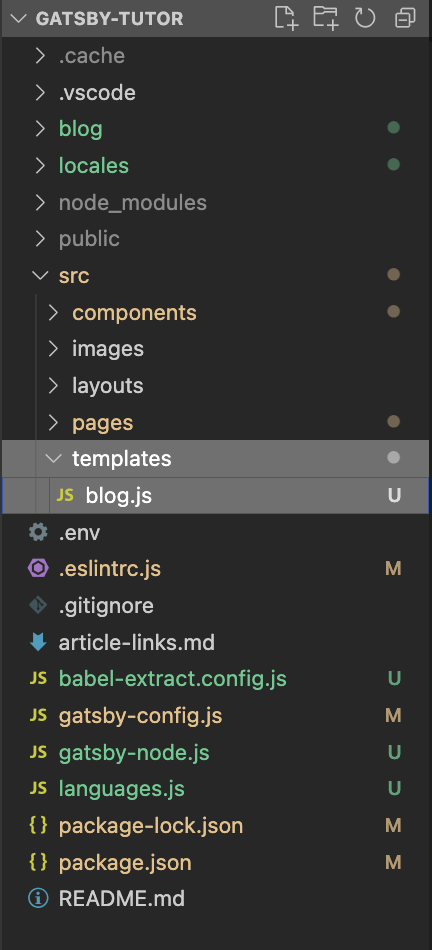
Here is how the file structure of the project will look:
{gallery-1}
If you don`t face errors during the deployment and launching of the project, the main page will be available at localhost:8000. Here is how it will look:

The project is ready to implement multilingualism. Let's get started!
Choosing the Gatsby plugin to implement localization and internationalization
The official Gatsby documentation provides two plugins that can be used to implement translations. We will use simple "translations" instead of the extended "localization and internationalization":
The choice may depend on your previous experience with similar libraries or the requirements for the implemented functionality.
gatsby—plugin—react—i18n is more suitable for cases with separate versions of pages for each language. For example, the plugin will host the Ukrainian version of the /about.uk.js page at /uk/about.
react—i18next is not a plugin from the Gatsby community itself. But, in the Gatsby plugins library is a plugin based on react—i18next—gatsby—plugin—react—i18next. This react-i18next and i18next can do numerous things (translate, format, replace phrases, etc.). Besides, their functionality can be easily expanded with the additional plugins.
We will not create separate page files for each language. Instead, we will translate phrases already in the files. The best choice for this task is the gatsby—plugin—react—i18next plugin.
Gatsby has detailed documentation with answers to most questions. The Gatsby community is actively working to extend the functionality by creating and maintaining a variety of plugins. Before making your functionality, find a solution in the plugin library. The names of all Gatsby plugins start with gatsby—plugin*, so they are easy to separate from other libraries.
Preparing the Gatsby project for installing gatsby—plugin—react—i18next
We must prepare a place to save all translations as JSON files inside the project. Our site will support two languages: English and Ukrainian. We must create a locales directory in the root and separate each language's directory. The abbreviated designations of the languages' names are "en" and "uk." We don't need to create JSON files in these directories; we will use automatic generation.
Next, we should configure the site's default and other available languages. There are two possible approaches:
— create the languages.js file and declare the variables defaultLanguage=’en’ and the array languages=[‘en’, ‘uk’];
— create a languages.js file in the root directory and declare the variables defaultLanguage='en' and languages, a dynamically built array with the values of directory names nested in locales ('en' and 'uk' in our case).
I chose the second option. In our case, adding a new language to the array is enough to create another directory in locales.
The languages.js file:
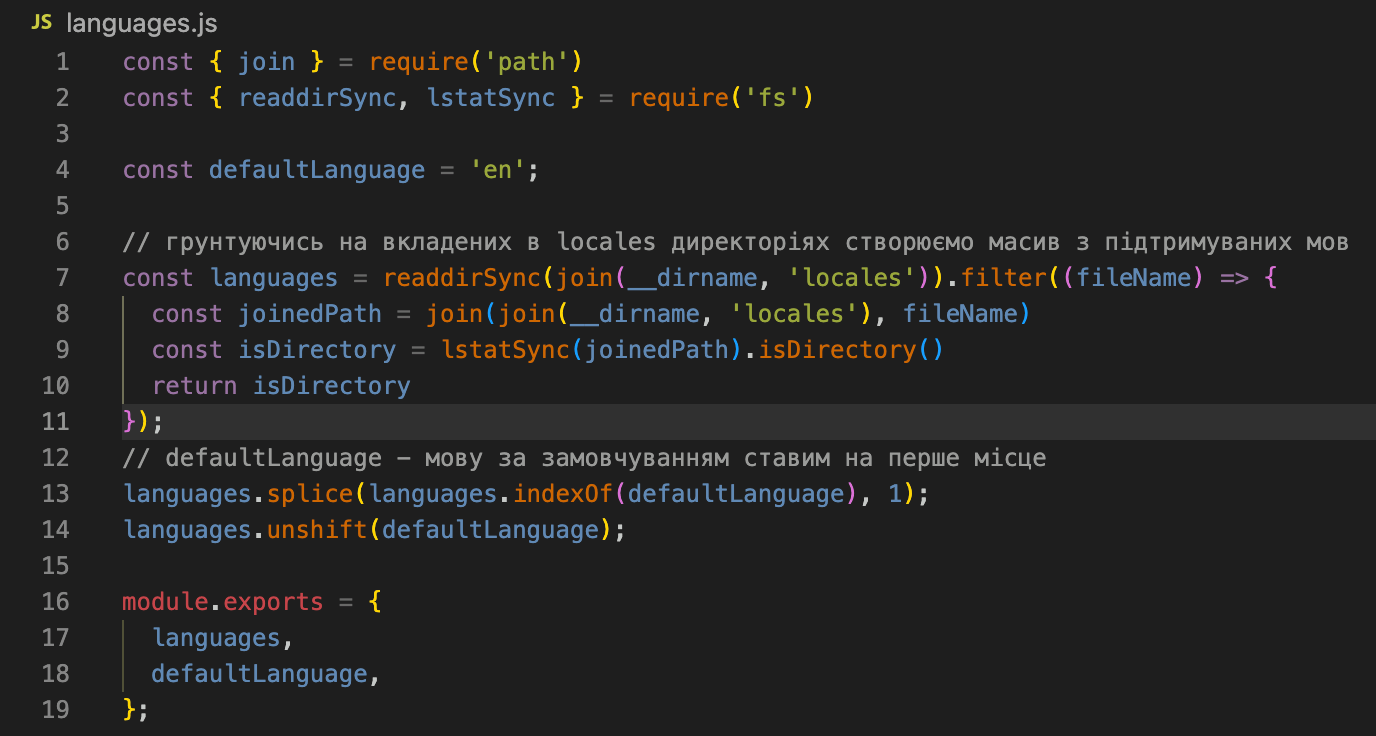
This script checks the directories nested in locales and creates an array of languages from their names. The command defaultLanguage is also declared here.
Installing and configuring gatsby—plugin—react—i18next
We have prepared the project to install the gatsby—plugin—react—i18next plugin. The next step is to install the necessary plugin and libraries.
# install the plugin and its dependencies
npm install ——save gatsby—plugin—react—i18next i18next react—i18next
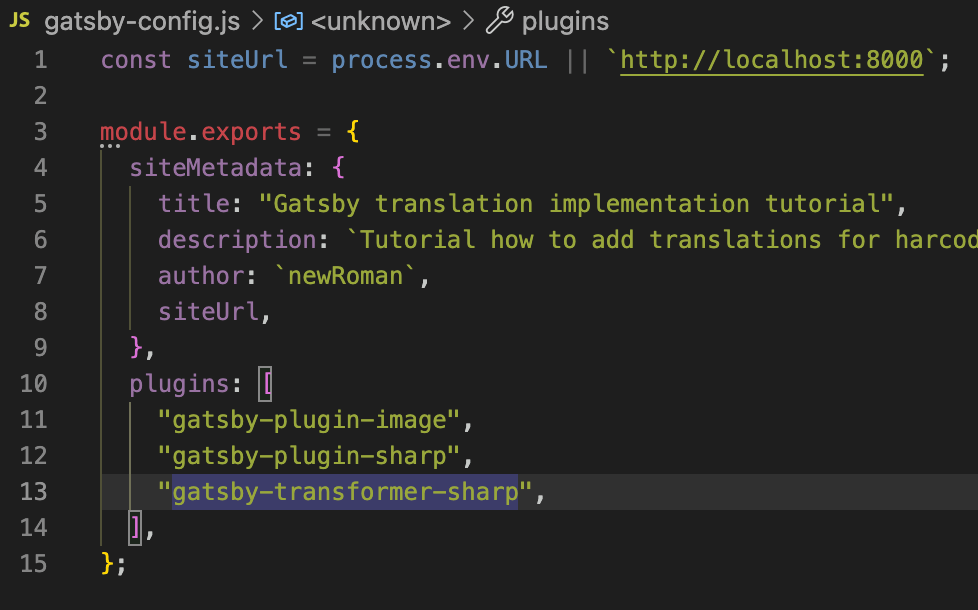
To configure plugins in Gatsby, use the gatsby—config.js file in the project's root directory.
Here are two stages of adding a plugin:
- The installation
- Entering the plugin`s data in the gatsby-config.js file
The installed plugin will work after you make Gatsby use it. You should add the plugin's name to its array of the gatsby—config.js file (if the plugin doesn't need additional settings for its operation and the default settings are enough for you). However, suppose you need to pinpoint specific settings, or you want to configure them. In that case, you need to add an object containing the "resolve" field with the plugin name and the "options" field as the object for setting values.
You can learn more about all gatsby—config.js values on the official documentation page.
So, open gatsby—config.js and add settings for the gatsby—plugin—react—i18next plugin.
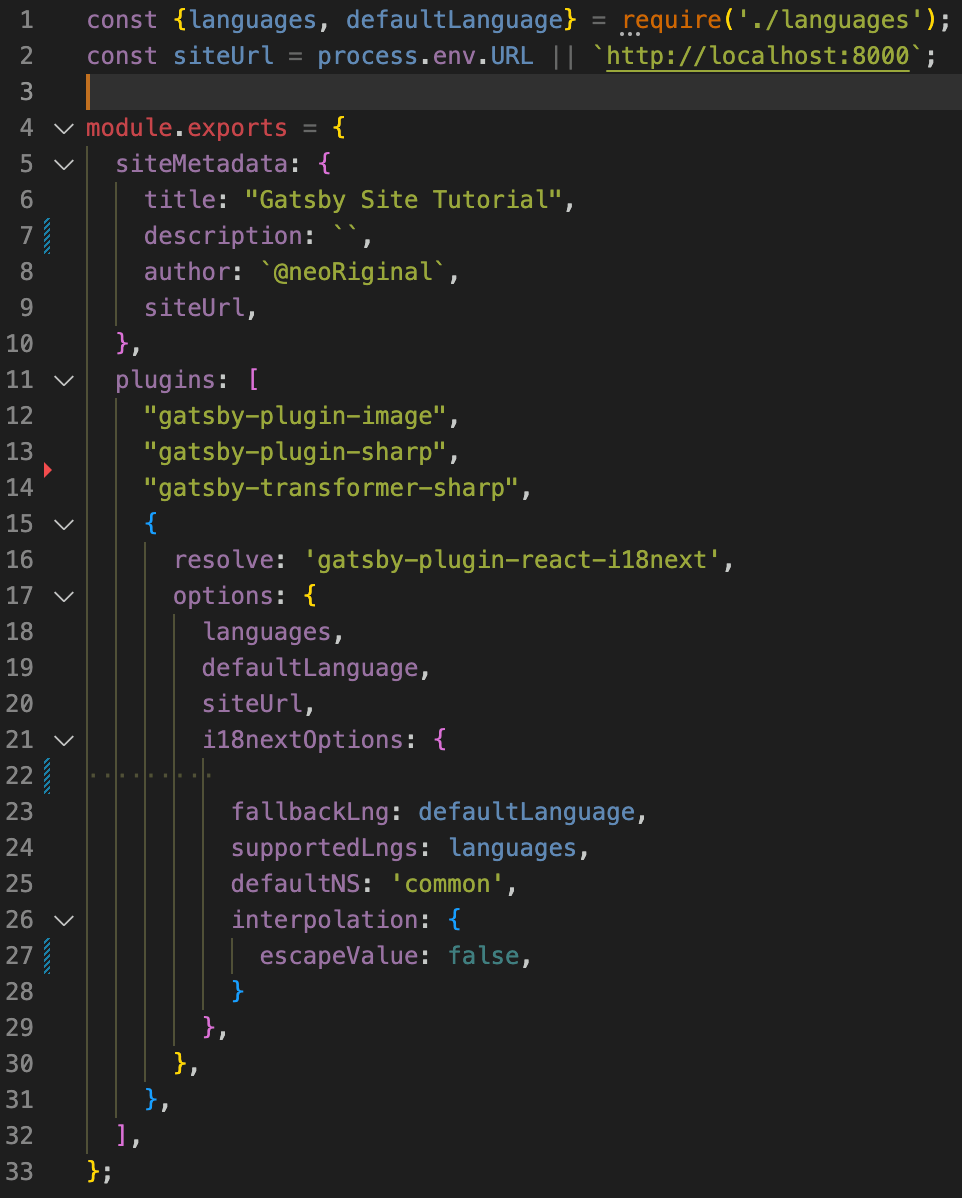
The defaultLanguage and the languages array from the languages.js file we created earlier are imported in the first line.
At this stage, we already have separate pages for each language in the form of uk/about, uk/blog, and for the English version /about, /blog. However, to correspond the phrases language to the page language, we should make several changes.
Replacing the phrases in the project files with the t() function from the gatsby—plugin—react—i18next plugin
The plugin is configured. Now we can change the site's components and pages.
At this stage, it is necessary to replace all phrases for translation with calls to the t() function of the gatsby—plugin—react—i18next plugin. At the same time, the arguments of the t() function will be the keys that will be used to save translated phrases in JSON files.
To make this function available, we must import the hook containing the function t() from gatsby—plugin—react—i18next.
Using the t() function is one of the numerous ways to get a translation of a phrase. Another common way is to use the <Trans> component. Both approaches are ok. However, I use the t() function, which is more accessible. Also, the official i18—next documentation advises using <Trans> only when t( ), highlighting that <Trans> components may take longer to build, which will affect page assembly (or rendering, if we're talking about SSR) speed.
Here is how the js file of the main page (index.js) will look after all the changes:
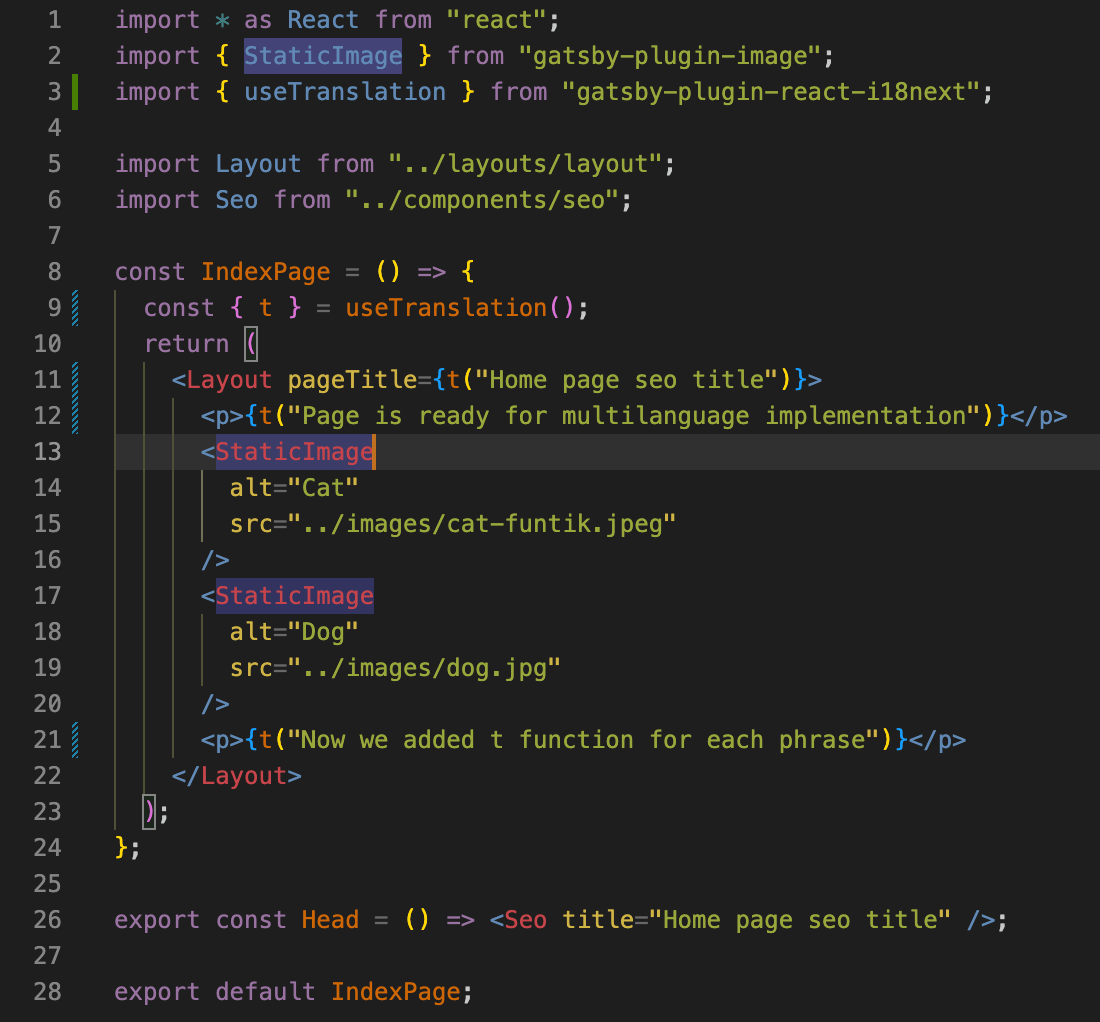
The t() function accepts as the first argument the name of the object's key in which this phrase is stored (in our case, it is a JSON file). There are several approaches to naming these keys. The t() function allows you to use both the semantic values of the keys — t('helloMyWorld') and the phrase as a whole — t('Hello my world'). In case of using whole phrases, the keys in the JSON translation file will be identical to the phrases themselves. I chose this option. Reasons will become apparent when we talk about auto-generation translations in JSON files.
Wherever multilingual support needs to be added, similar phrase manipulations are required. In our case, these are the files pages/index.js, pages/about.js, pages/blog.js, and components/navigation.js.
Now, when all the phrases are replaced, we can add the automatic generation of translations into JSON files.
Adding automatic translations generation in JSON files using babel—plugin—i18next—extract
Use an automatic plugin to avoid the manual creation of JSON translation files.
Install this plugin:
# install the plugin and its dependencies
npm install —save—dev babel—plugin—i18next—extract @babel/cli
To configure the plugin in the root directory, create a babel—extract.config.js file and add the options:
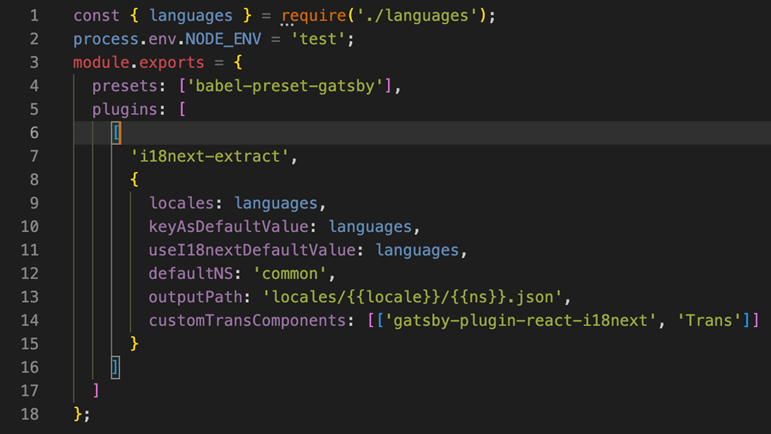
You can choose not to change the configuration and use the default one. However, it is better to change some options for fine-tuning. The complete list of options is on the plugin's website.
The plugin's official documentation suggests configuring the plugin using a .babelrc file. Still, for Gatsby projects, creating a separate babel—extract.config.js file and configuring the plugin in it is essential. It is because Gatsby already uses .babelrc for work, and by creating another one, we risk overriding some settings for Gatsby and breaking the correctness of the project's work.
Also, we create in package.json a command for auto-generating translation JSON files. Let's call it the extract:

At this stage, auto generation will already be working, so we can execute the extract command:
# perform auto generation of JSON translation files
npm run extract
Everything seems to work, but let's look at the result:
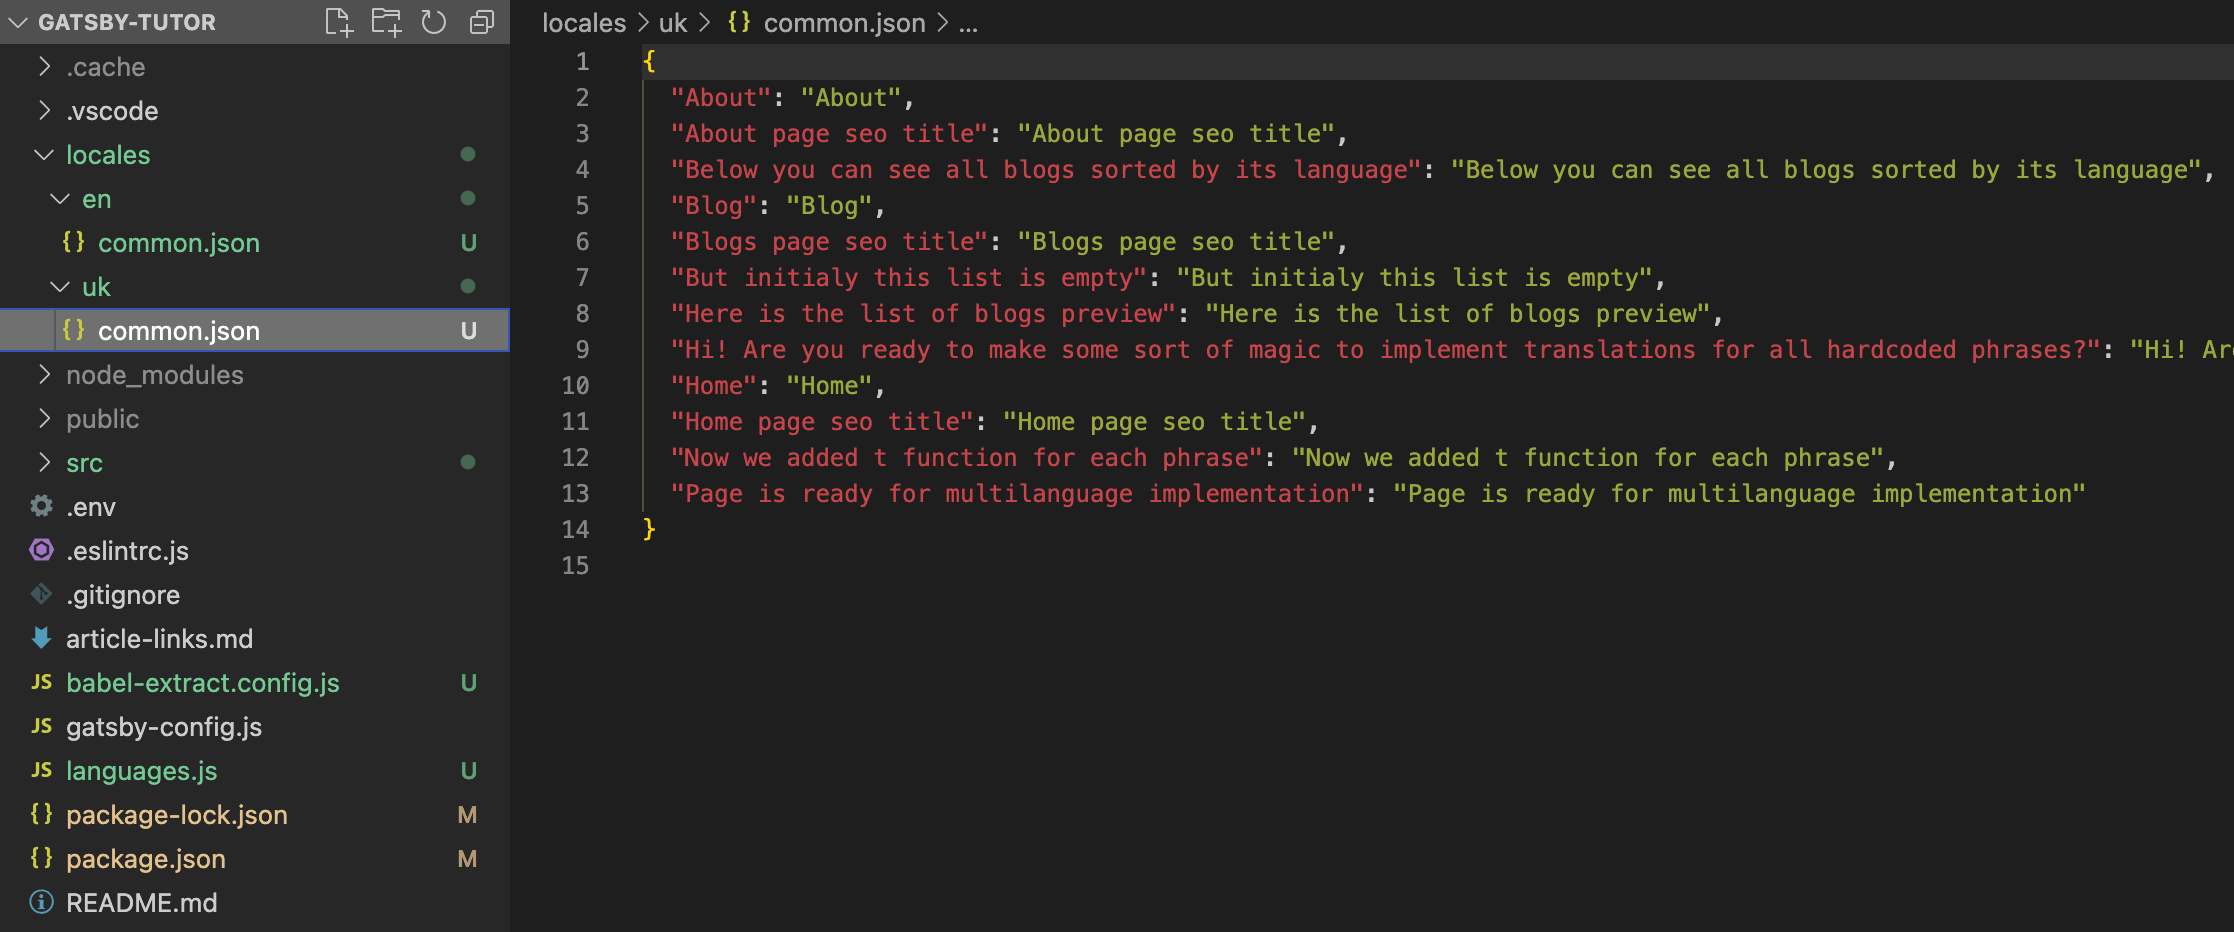
In each subdirectory of the locales directory, a translation JSON file was generated — locales/en/common.json and locales/uk/common.json. If you open one of these files, you will see that it contains phrases from all pages and components of the project. This approach is quite suitable for further work (especially for small projects). Still, storing translations for each page or component in separate files is better. Using the terminology of i18next, we will call such files namespaces.
This approach has several advantages:
- smaller files are easier to navigate for both the developer and the translator;
- it is possible to download only those translations that are used on the page;
- the structure of translation files becomes clearer and simpler.
In our case, all translations can be divided into the following namespaces:
- index — for the ‘main’ page;
- about — for the ‘about’ page;
- blog — for a page with a list of blogs blog;
- common — for common phrases for the entire site (names of navigation menu items, etc.).
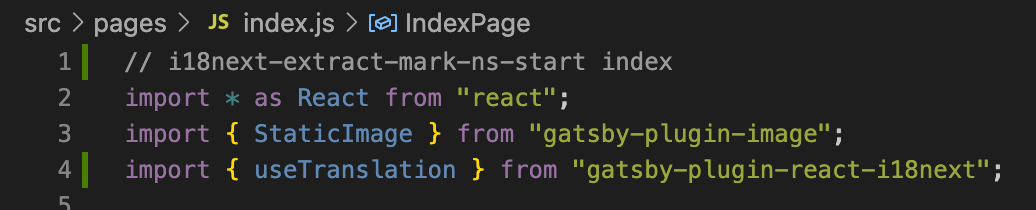
Therefore, for each file, it is necessary to indicate to which namespace it belongs so that the babel—plugin—i18next—extract plugin creates a separate JSON file for each namespace with phrases that belong to this namespace. It is easy to do with the special i18next—extract—mark—ns—start comment of the babel—plugin—i18next—extract plugin.
You can view the complete list of special comments on the plugin's website.
Now, let's add the following special comments with the name of their namespace for each file from the pages:


For the components/navigation component, add the namespace common:

You need to be careful. If a namespace is not defined for a file with the t() function, all phrases from this file will end up in the common.json file since the namespace common is the default namespace. Also, all phrases where the namespace is not specified will become a part of such a namespace.
The default namespace name is configurable. You can do it in the plugin configuration file babel—plugin—i18next—extract — babel—extract.config.js. Field value defaultNS: defaultNS: "common."
Delete the previously generated common.json from the locales/en and locales/uk directories and rerun the auto generation command.
# perform auto generation of JSON translation files
npm run extract
As a result, we will get the following:
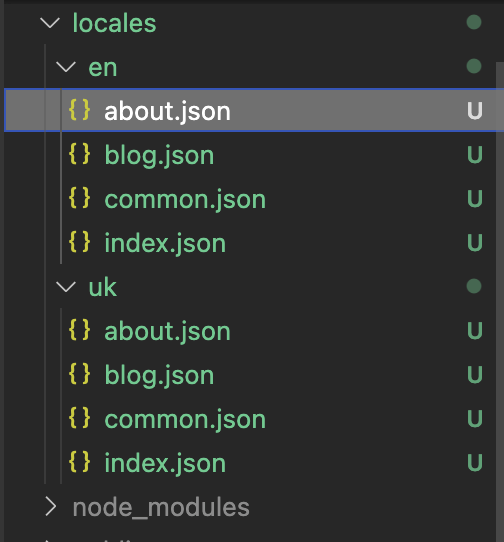
We have translations stored in different files, which coincide with the names of the namespaces we defined earlier. The contents of the files for both the en and uk directories are identical, so the next step is to pass the files from the uk directory to the translators. For convenience, you can use special services (such as Locize) designed to simplify the interaction between developers and translators. But in our case, we will translate the phrases into Ukrainian ourselves.
At this moment, we have generated the translation JSON files and translated phrases into Ukrainian. Next, we should make the site understand which translations to show and when.
Uploading namespaces to the site pages
How to make the project pages and components access JSON files from locales/en and locales/uk? We can use gatsby's data layer and GraphQL. I will not describe their interaction, but you can familiarize yourself with it on the documentation page.
In other words, all the data described in the project`s javascript files using GraphQL queries are collected in a data layer. While building pages, Gatsby detects all GraphQL queries, downloads the described data, and uses it to create pages.
The interaction of the data layer with GraphQL is impossible without a gatsby-source plugin installed from the Gatsby Plugin library. Such a plugin allows Gatsby to receive data from various sources and make them available in the data layer. Each data source has a separate plugin (sources can be third-party services, CMS, locally located files, etc.). In our case, making local files from locales/en and locales/uk available in the data layer (as a result, on the site pages) is necessary. Thus, a gatsby—source—filesystem plugin needs to be installed:
# install the plugin
npm install gatsby—source—filesystem
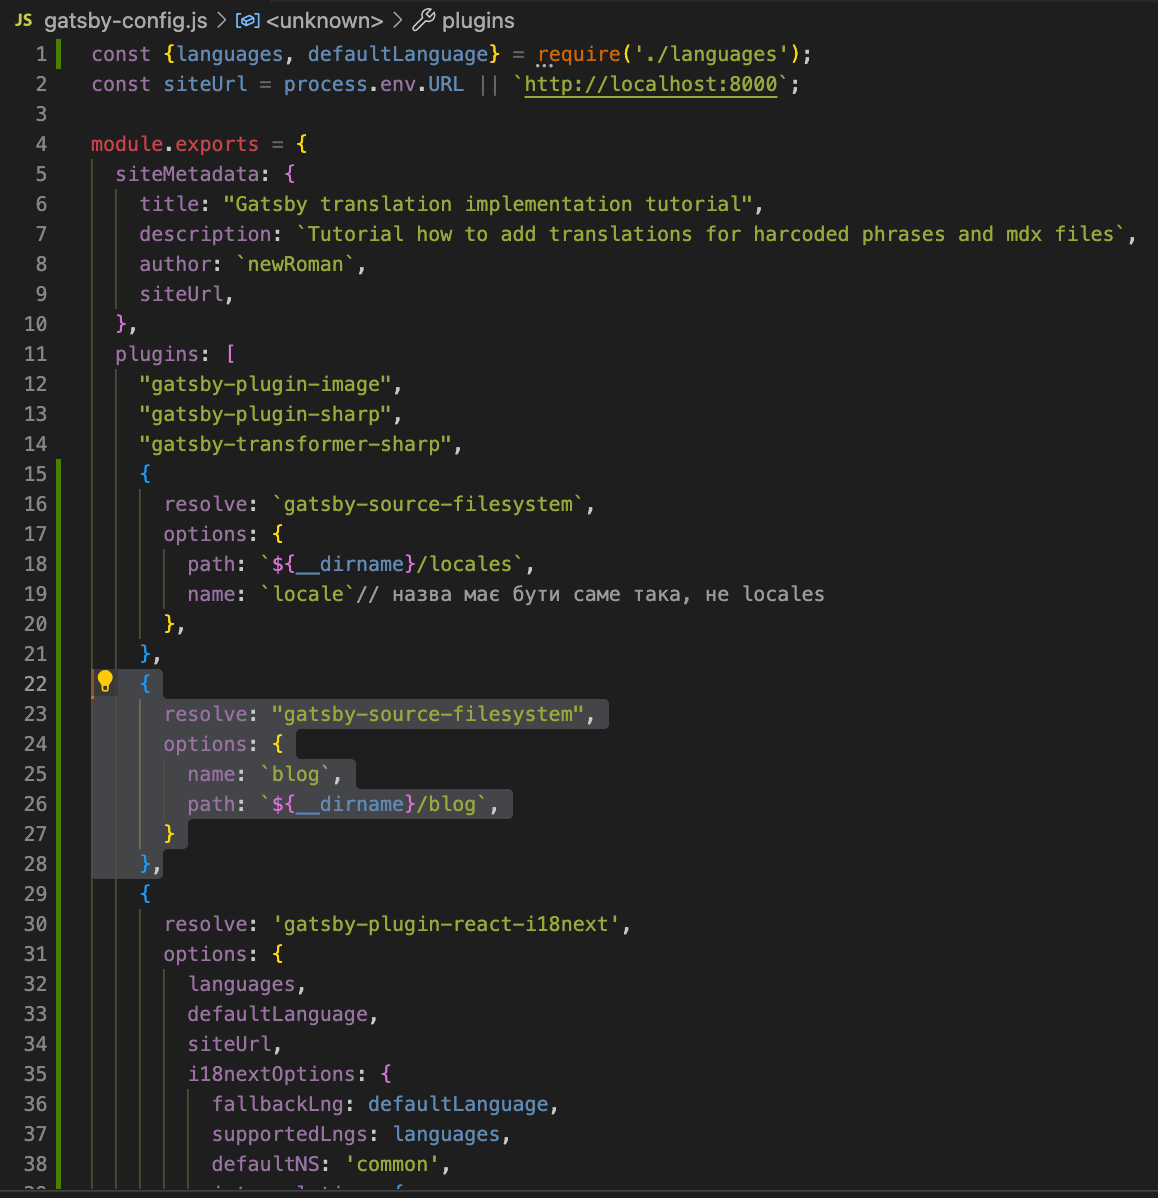
Make all the needed configurations for the installed plugin in gatsby—config.js so that it understands with which local files to work:

Next, export a GraphQL query from each page file (directory pages/) where multilingualism is required, and specify which namespaces are required for this page.
For the main page (namespaces ['common', 'index'] — line 32):

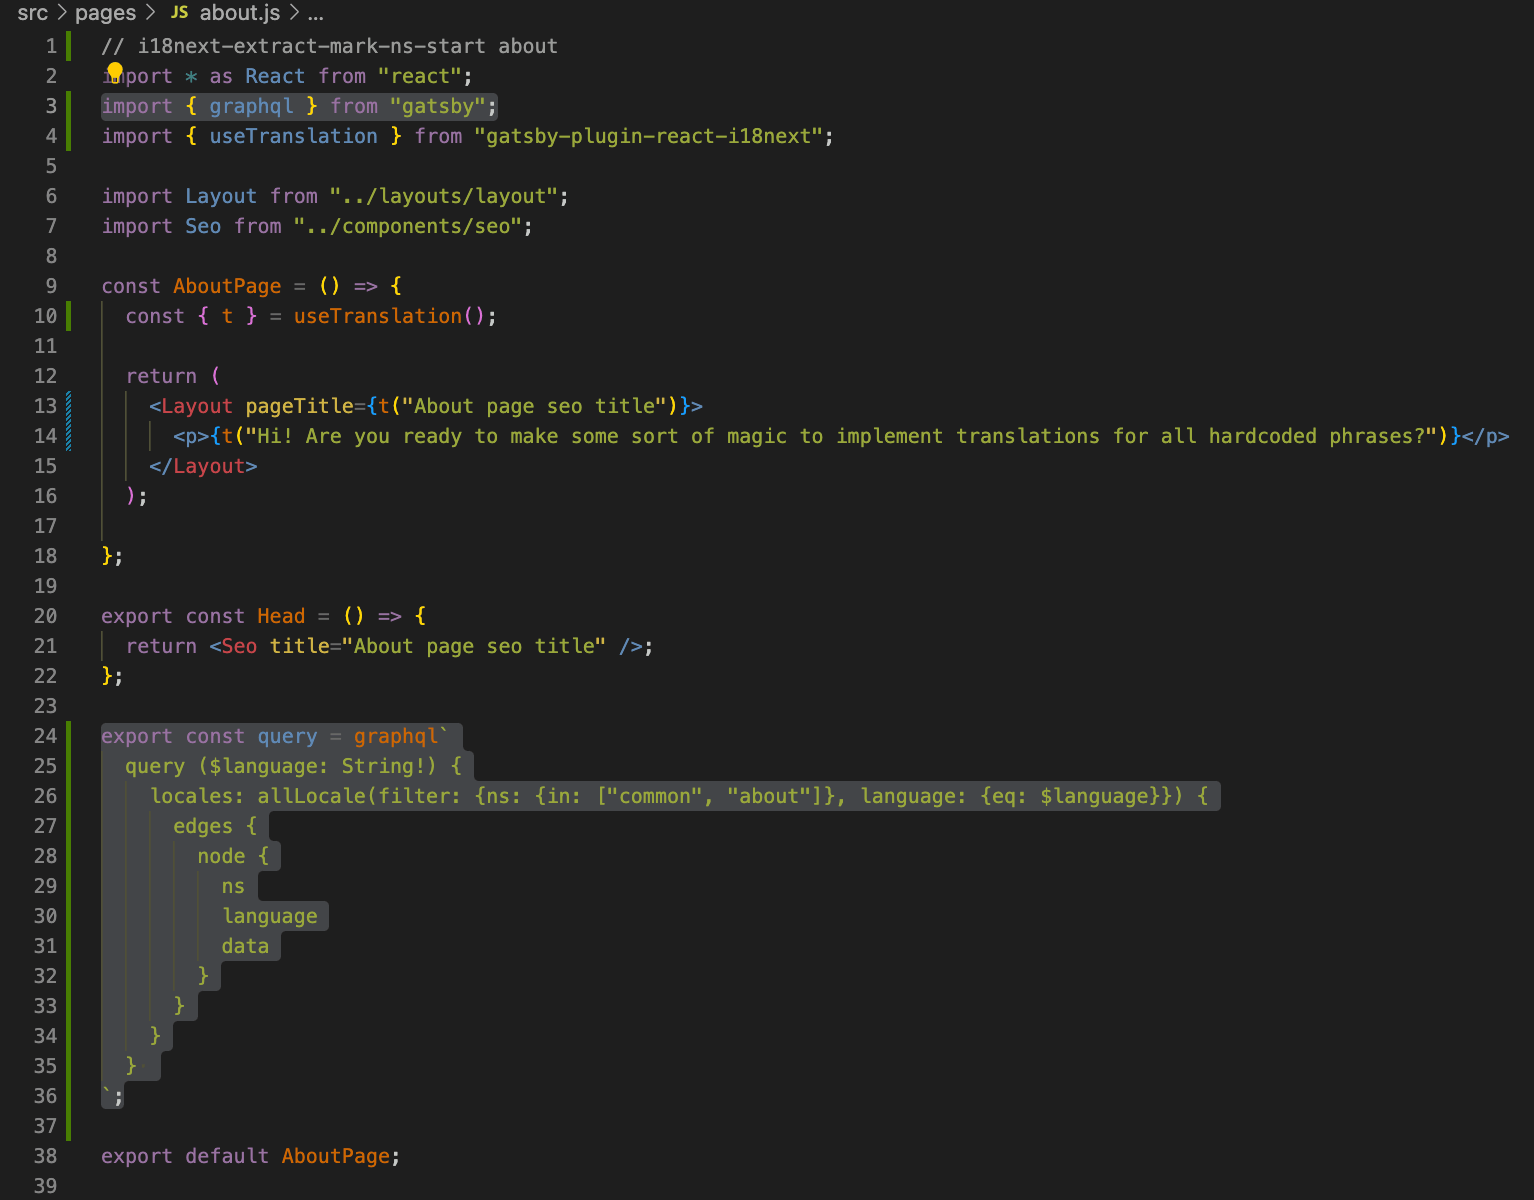
For the About page (namespaces ['common', 'about] — line 26):
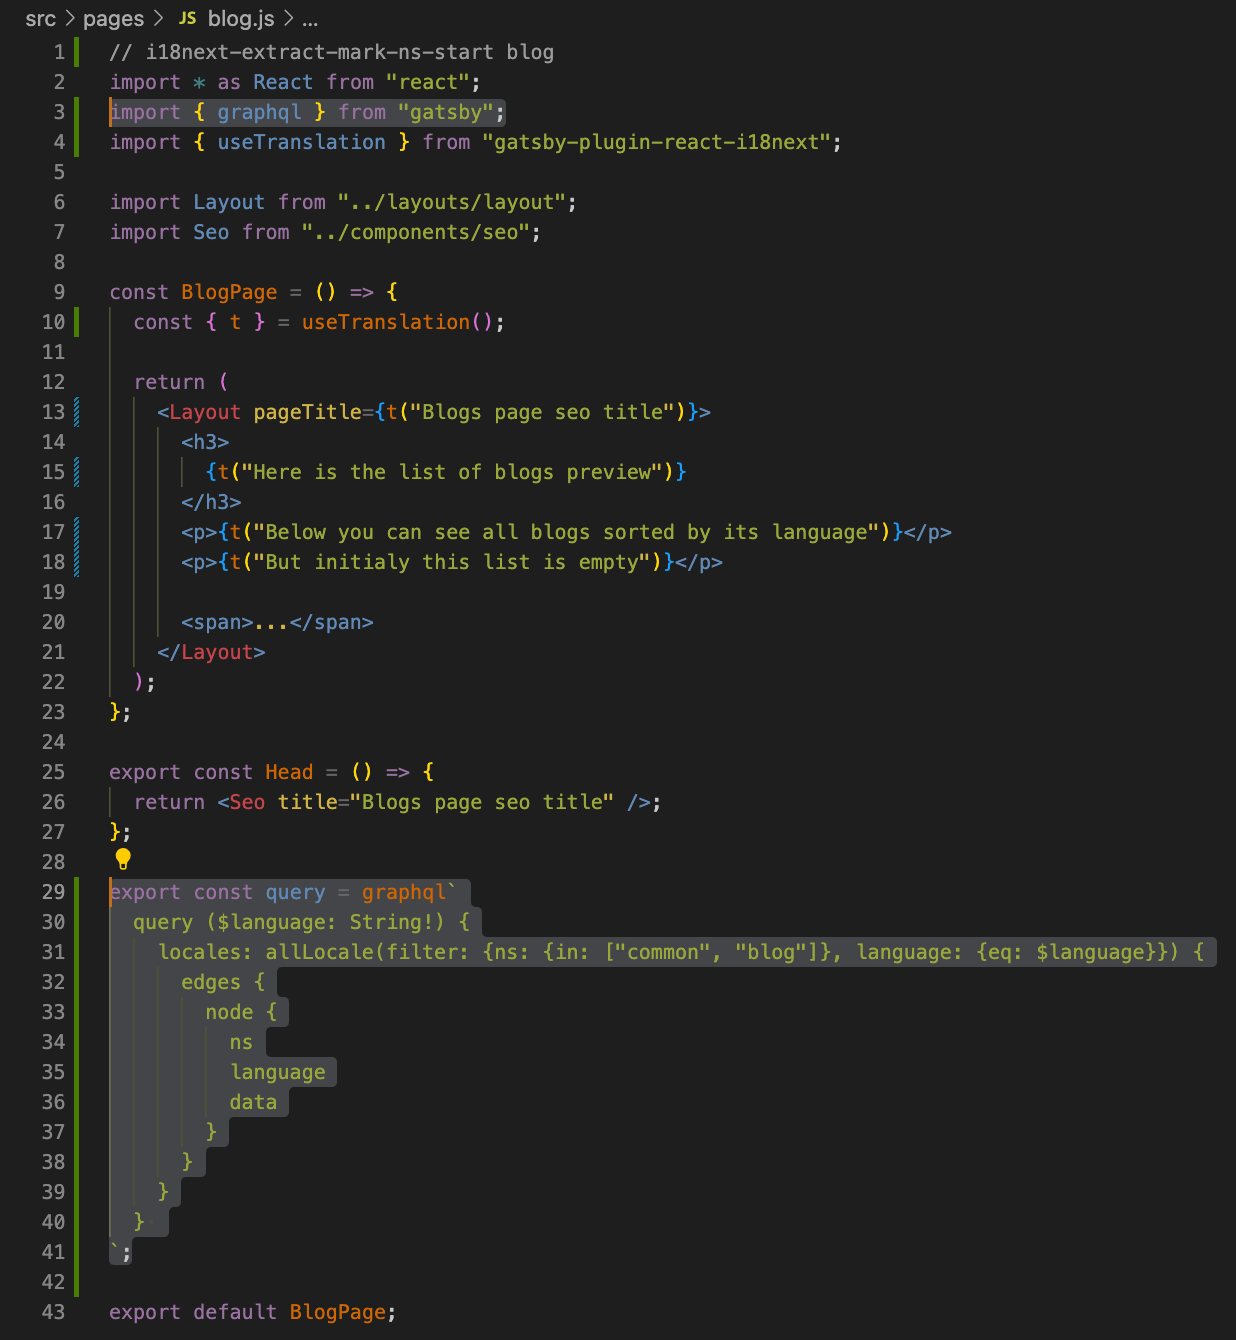
For the Blog page (namespaces ['common', 'blog] — line 31):
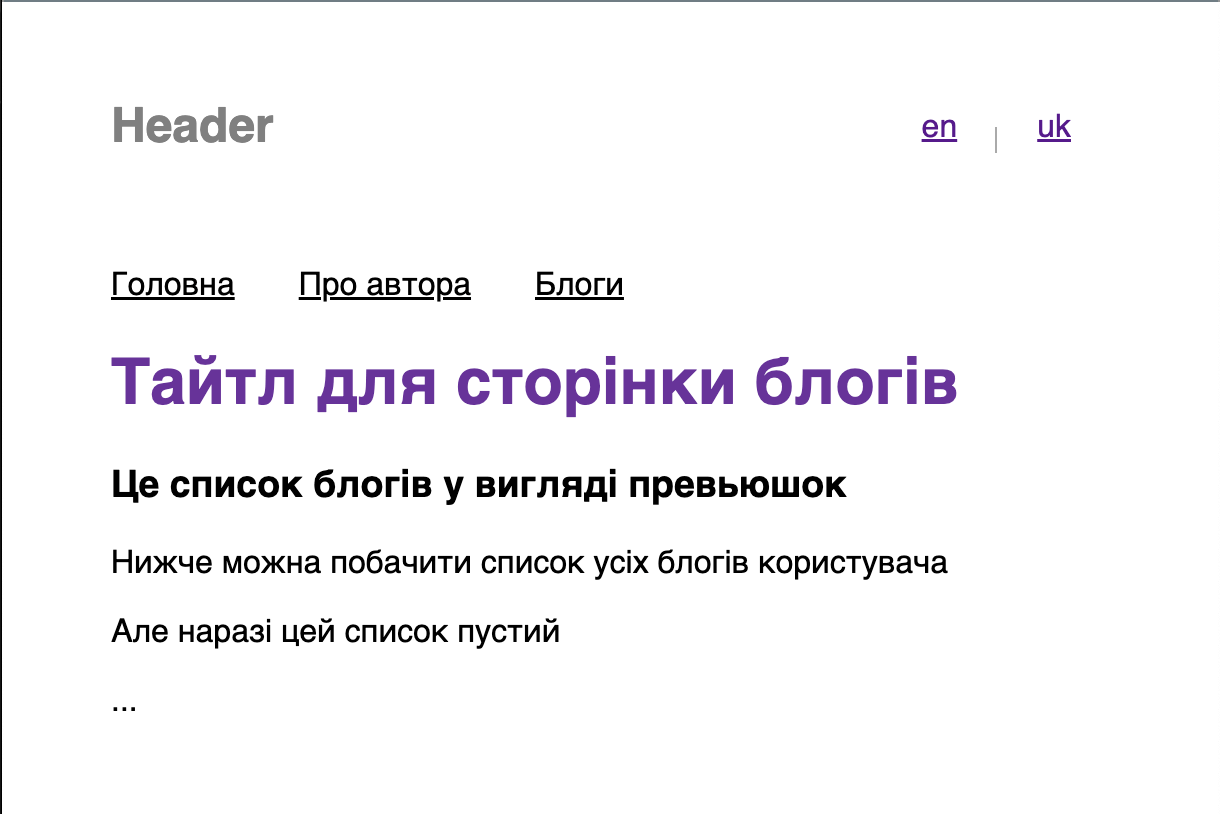
At this stage, the phrases already respond to the language of the page, and multilingualism works. You can check it on the page /uk/blog or /uk/about for the Ukrainian version and /blog and /about for the English version.
It is awkward to change the address to switch between languages manually. So, we should add a language switcher and correct navigation between pages.
Adding navigation with multilingual support and a language switcher
We should add a simple language switcher to change languages on the site easily. Make changes to the components/header:
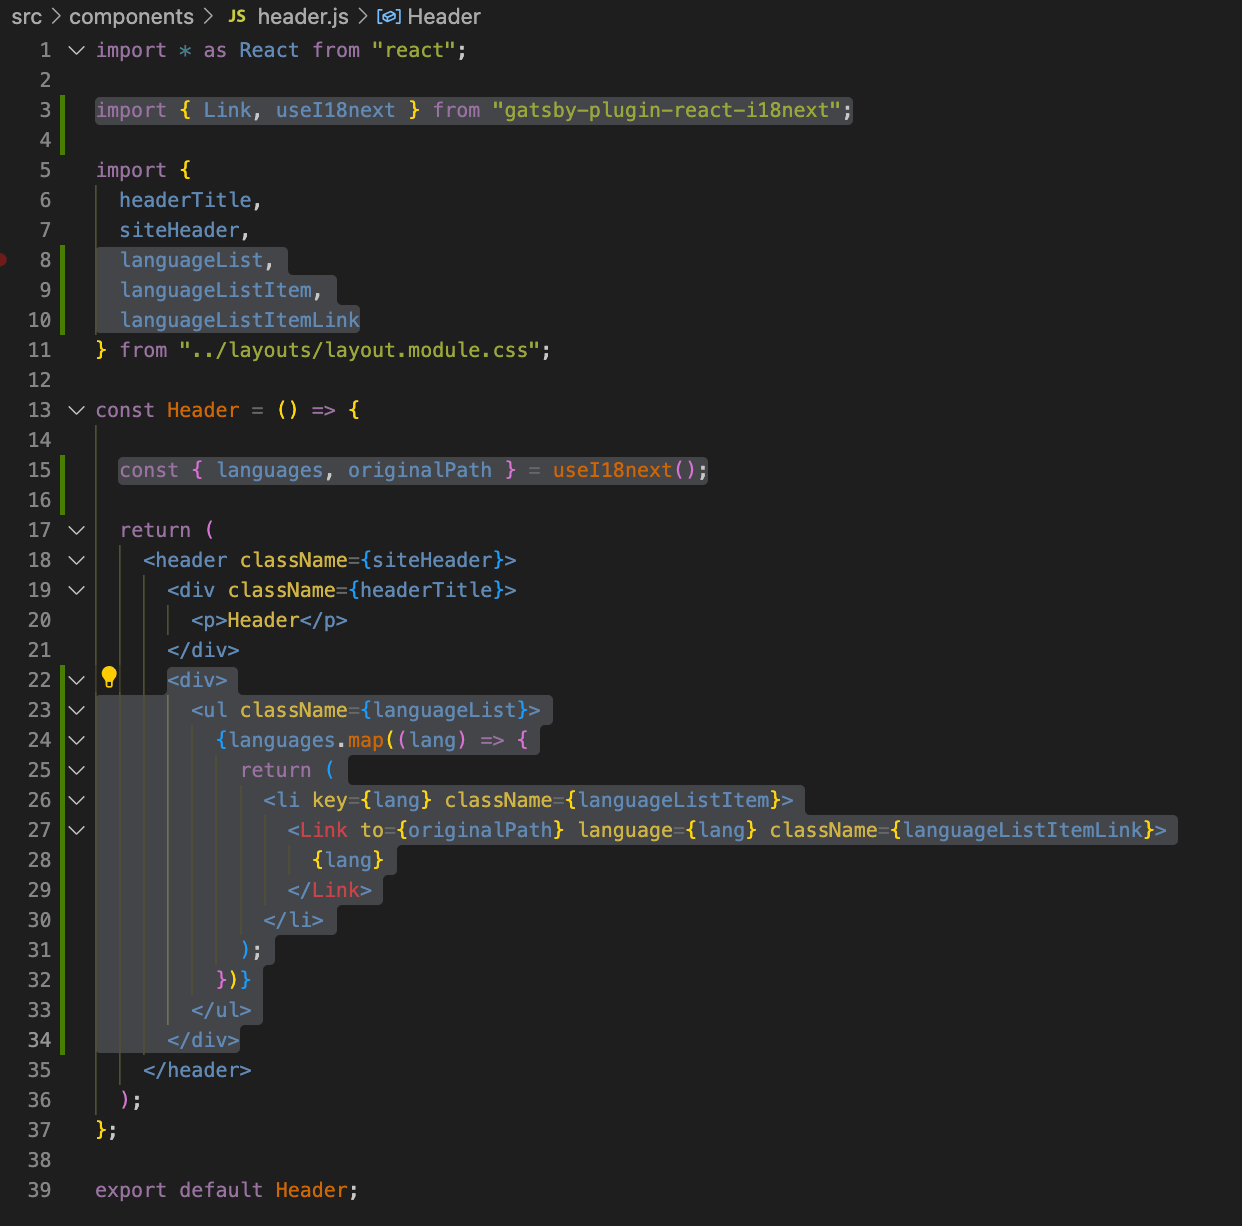
Pay attention to the <Link> component from the gatsby—plugin—react—i18next package. Unlike the same-named one from Gatsby, this component can accept additional values and build links to pages based on the user's current language. So, it will allow us to correctly switch languages on any page.
A language switcher is added. Here is how it looks:
Language switcher works. Despite this, navigation can be better. Attempts to switch pages while the Ukrainian language is active are completed by opening the English version of the page. To fix this, make changes to the components/navigation:
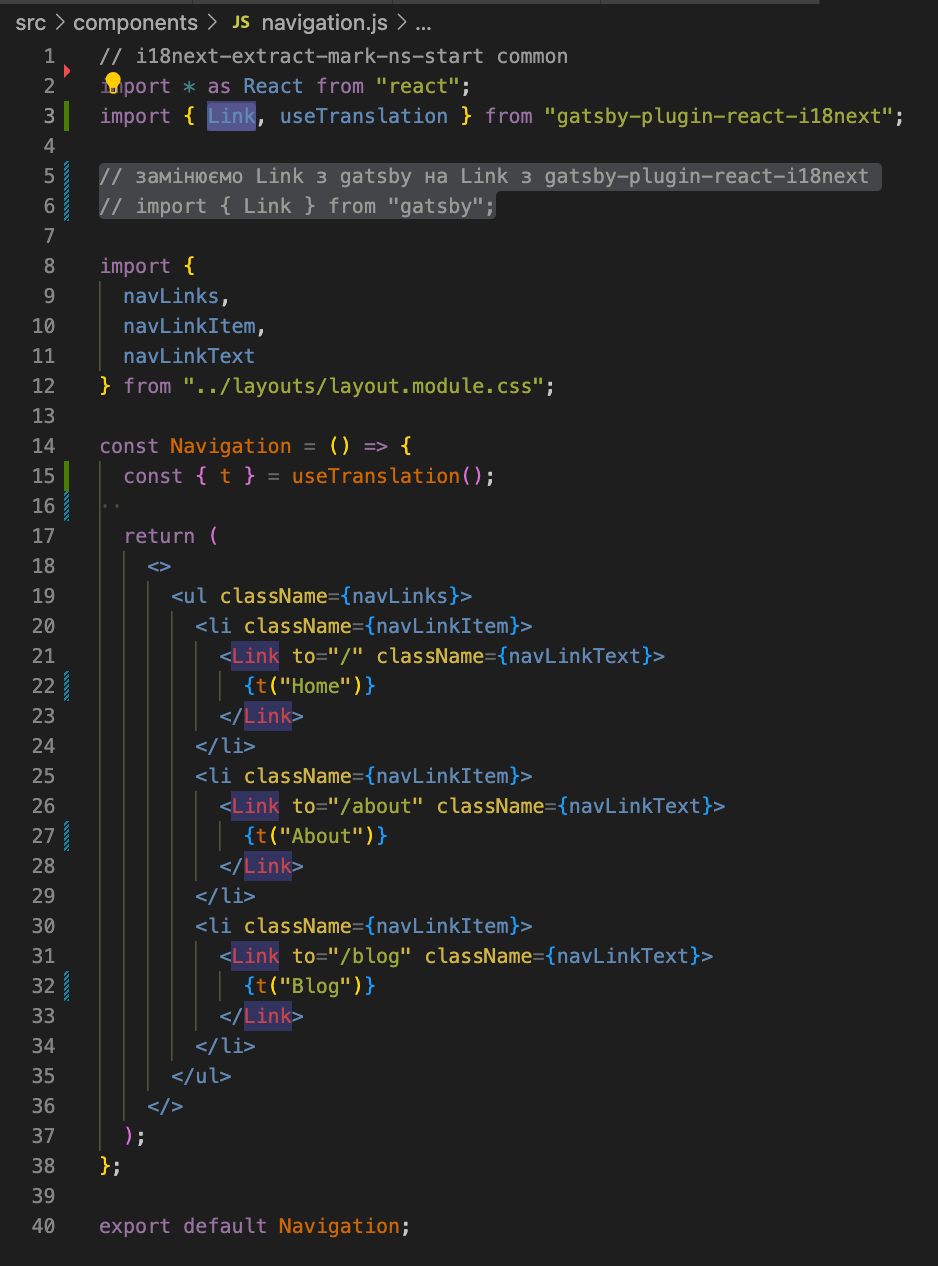
Replace the <Link> component with a same-named one from the gatsby—plugin—react—i18next package. As described above, it will form links considering the active language.
At this stage, our project can change the language and display pages in the user's chosen language. But our translation works only for static phrases in the code of pages or site components.
However, .md or .mdx files are often used to create articles or blogs in Gatsby projects. Therefore, we should consider one of the ways to add multilingualism for pages based on such files.
Creating MDX files for multilingual articles
If you need to create your first website with articles and don't have the time or desire to deal with CMS integration, use .mdx files as a content source for your texts. It will display your content on separate pages as if you have used HTML markup. You can read more about MDX here.
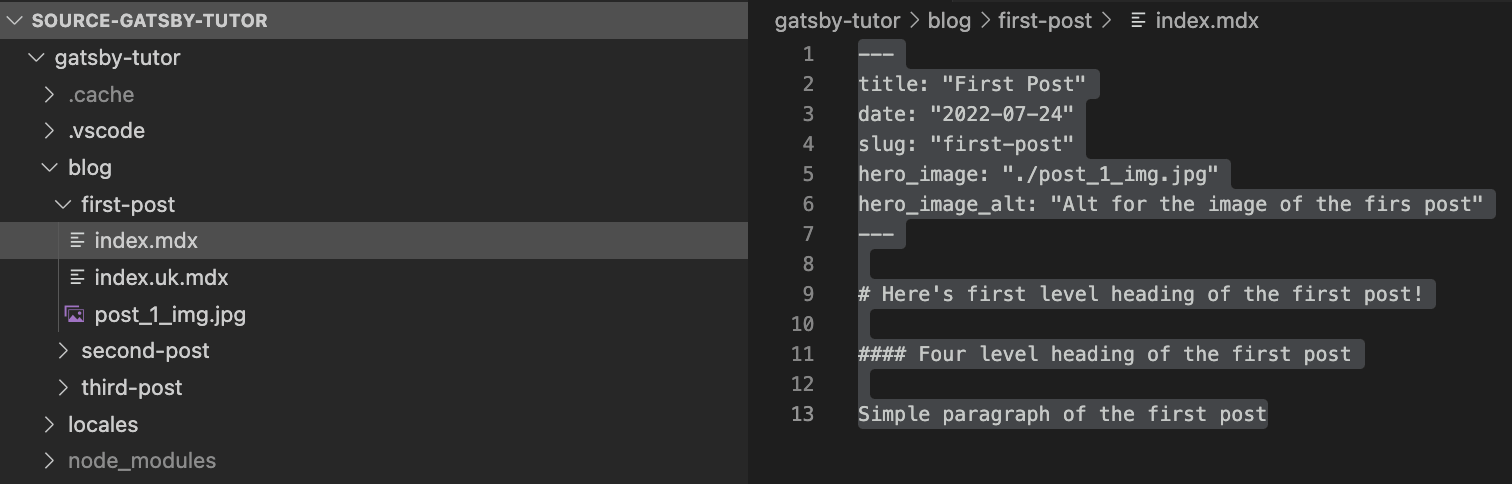
Let's create a blog directory in the project's root directory. It will contain subdirectories dedicated to separate articles. Suppose we have three pieces. Therefore, we will create different directories for each of them. Also, we will add images for each article and the article files in .mdx format. Each piece will have two language versions. We will create a file in .mdx format for the Ukrainian version with the language code in its name (index.uk.mdx).
MDX file for the English version of the article (blog/first—post/index.mdx):
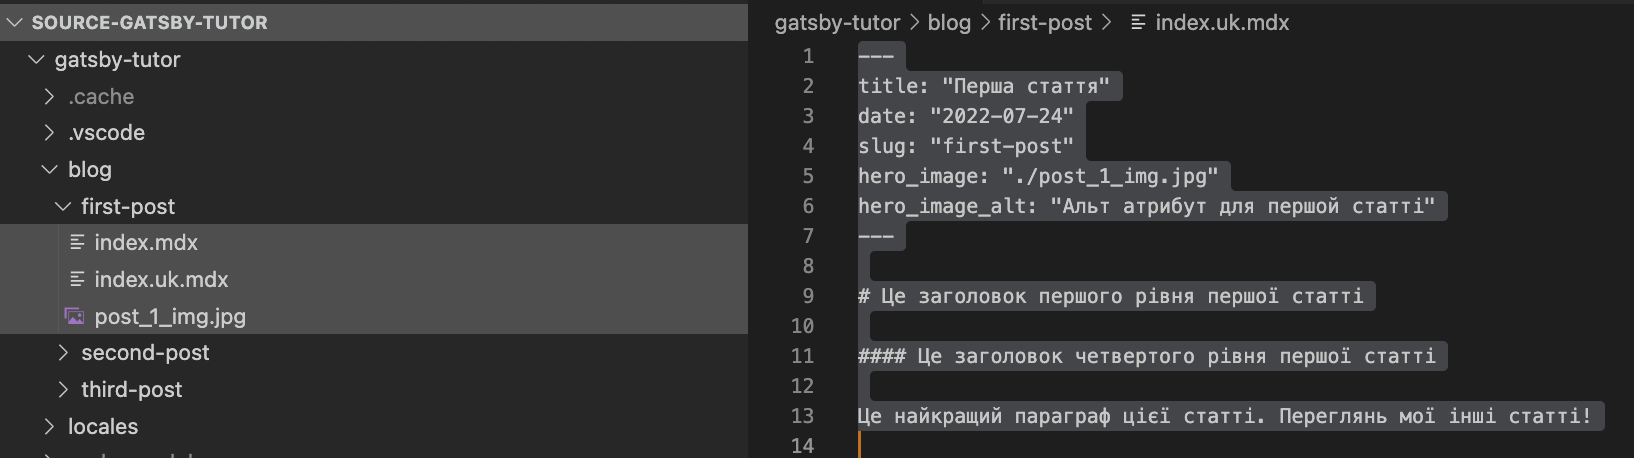
MDX file for the Ukrainian version of the article (blog/first—post/index.uk.mdx):
Similarly, we will do the same for two more articles. The image above shows how the blog/ directory will look with three already-created subdirectories.
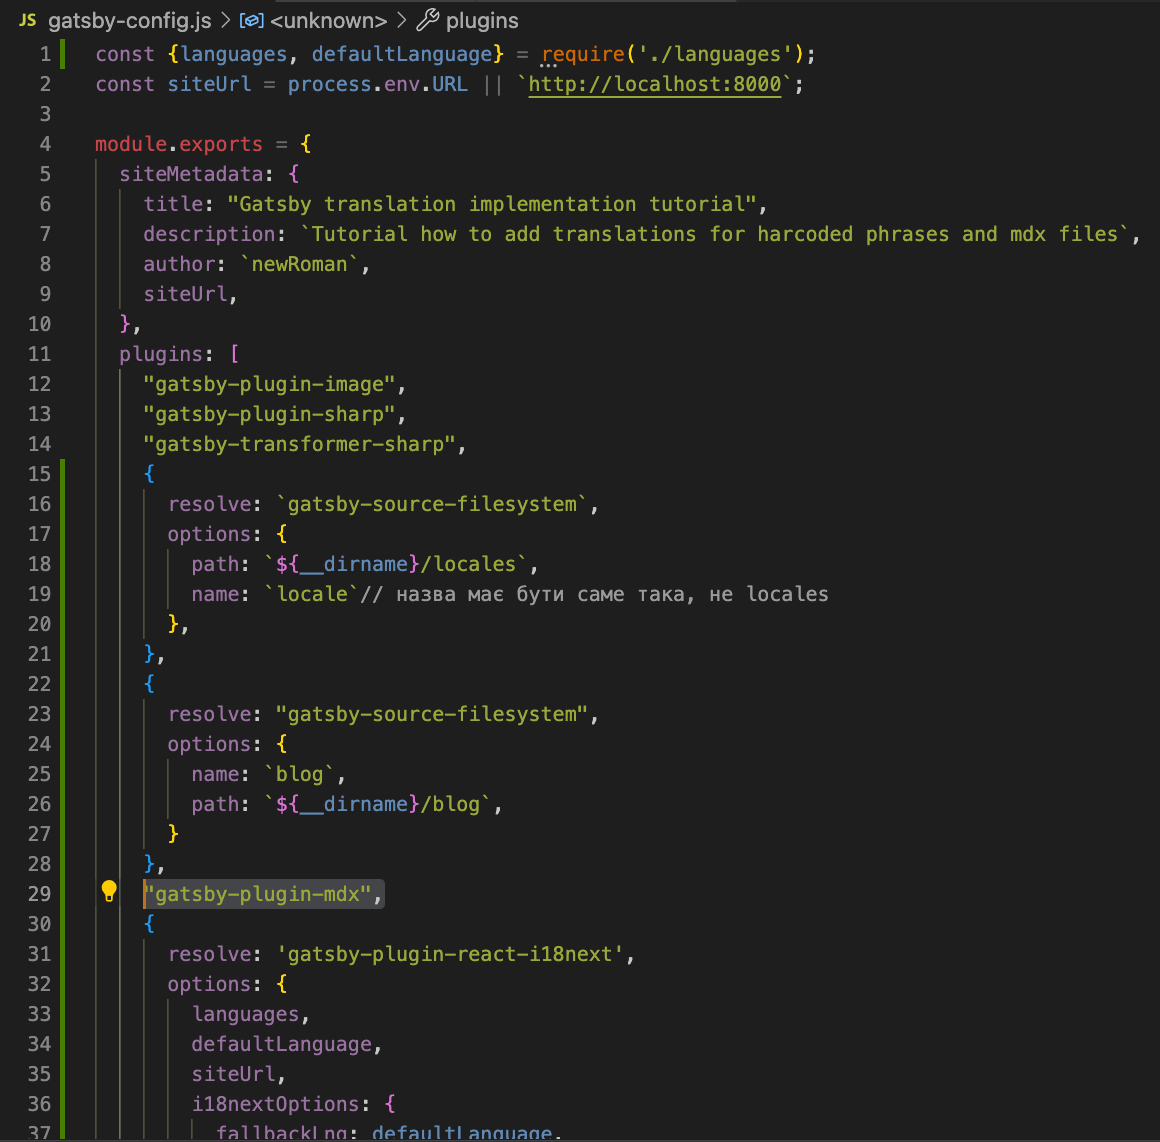
These files must be available on our components and project pages. Since these are local files, the approach is the same as while adding multilingualism for static phrases for locales/en and locales/uk (in the previous sections). Add another option for the gatsby-source-filesystem plugin in gatsby-config.js:
It is also necessary to install gatsby—plugin—MDX plugin. It will allow us to convert MDX files into data that can be obtained using GraphQL:
# install the plugin
npm install gatsby—plugin—MDX
Add the newly installed plugin to gatsby—config.js:
Displaying the list of articles on the page
The gatsby-plugin-MDX and gatsby-source-filesystem plugins allow project page files to access data from the blog directory's MDX files. It is necessary to create a corresponding GraphQL query. Since we already have a prepared list of articles page — pages/blog.js, we need to change the existing GraphQL query.
Changes in the query page pages/blog.js are highlighted text in the image:
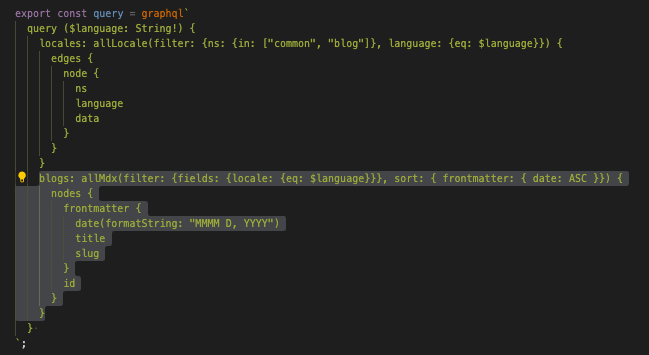
GraphQL query describes the structure of the data received by the component in the component's props (in our case, it is the blog page component — <Blog>). We need to deconstruct articles with props. Then, display the information of each piece using the map method. To build links to each article, use the <Link> component from the gatsby—plugin—react—i18next package. We need links for different language article versions, so it is better to use the <Link> component from the plugin immediately—react—i18next rather than from Gatsby.
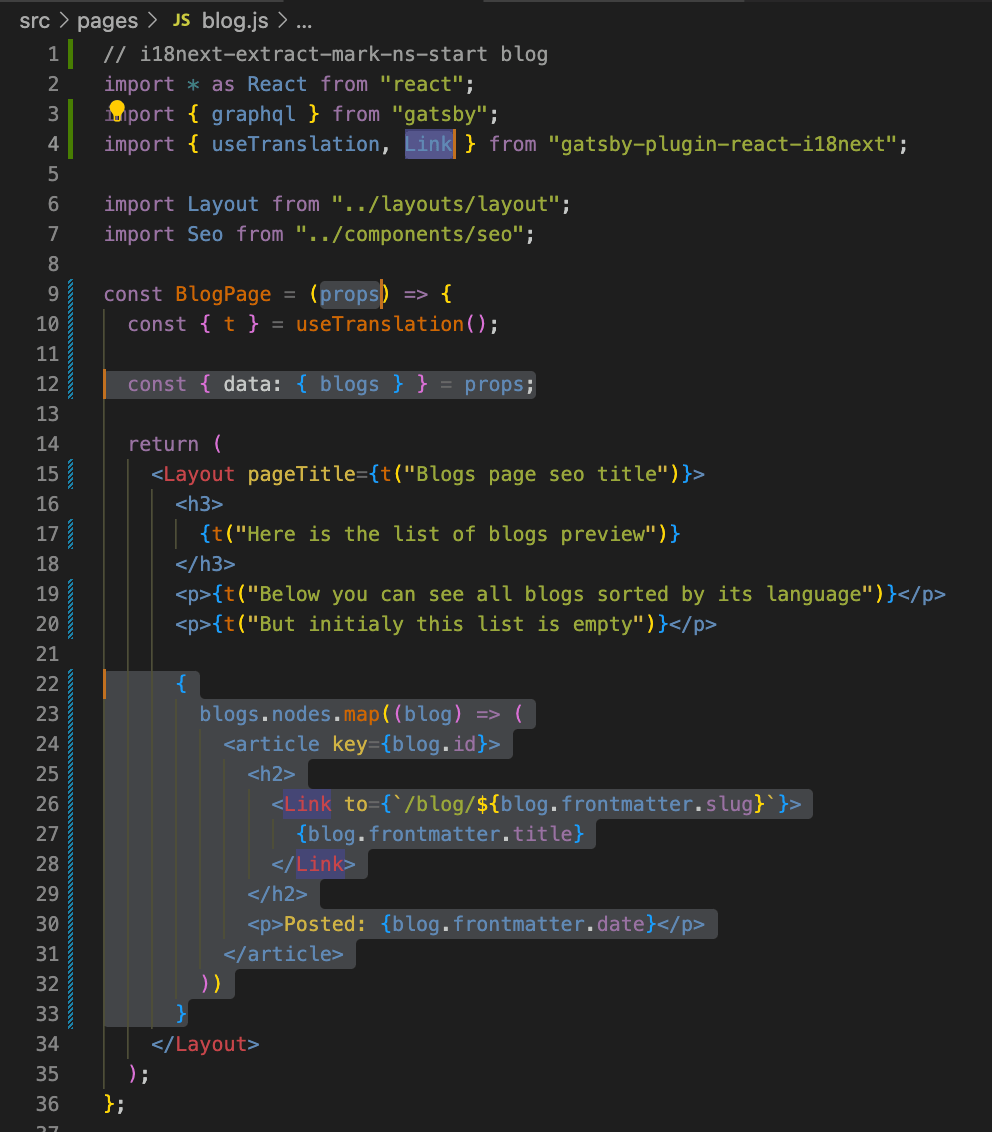
Here are the changes in the <Blog> component (highlighted):
Working with data retrieved from MDX files with GraphQL can be confusing, so refer to the Gatsby documentation for a better understanding.
These changes to pages/blog allow us to retrieve and display on the blog page all articles that are saved in .mdx format. Here is how it looks on the page:
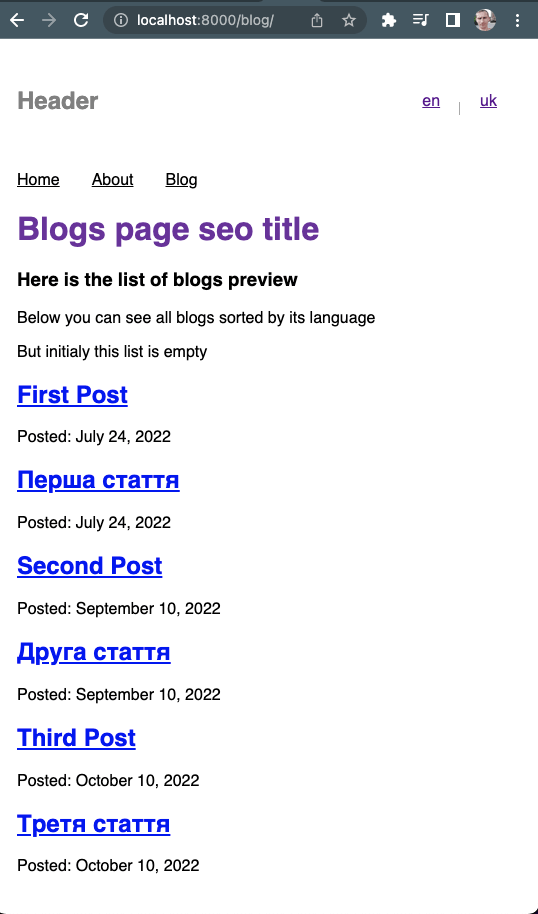
As you can see, we received articles in all languages. However, there should be only English since the active user's language is English.
Let's fix it.
Displaying a list of articles according to the selected user`s language
Gatsby allows building pages dynamically during the project building. It is also possible to dynamically add new fields in GraphQL with the gatsby node APIs.
Working with gatsby—node APIs assumes that you already have a higher than initial familiarity with Gatsby. If you haven't worked with this framework yet, learn more here.
In other words, we can use .mdx files to build pages dynamically (during project assembly). We can also modify the data in page components obtained by GraphQL query. The file gatsby—node.js is responsible for this, which you must create in the project's root directory.
Let's describe the onCreateNode function. In this file, we will add new fields for data of the MDX type. It will allow us to use pages/blog.js for sorting by language on the article list page.
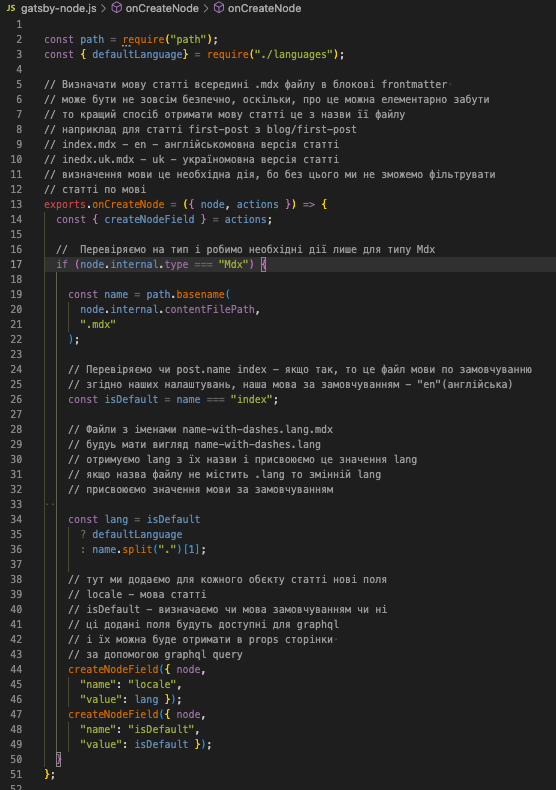
Now two added fields, locale and isDefault, will be available for GraphQL query. The locale field can be used to sort articles by language, as it will be added to each piece and contain its language value.
Let's change the GraphQL query for the pages/blog.js file to filter articles by their language:

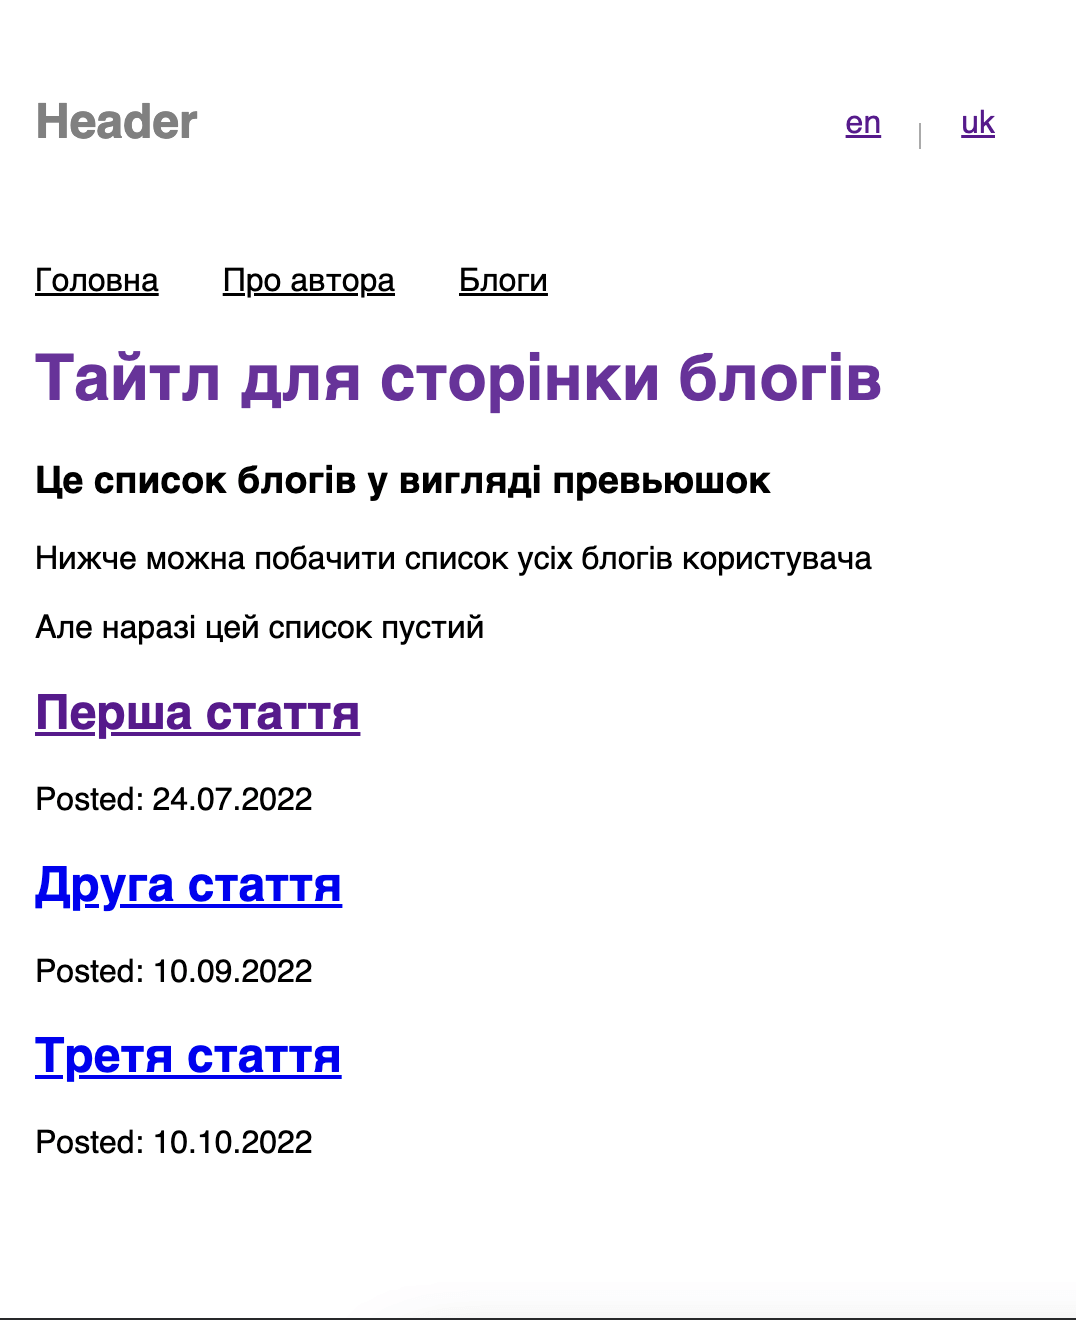
Now, the list of articles contains only those whose language corresponds to the current one the user selects:
The next step is to create separate pages for each piece.
Creating separate pages for articles
We will use the gatsby node APIs to make each article available in two languages with separate addresses. Let's add the createPages function to the gatsby—node.js file right after onCreateNode.
It will allow us to create a separate page for each .mdx file and make available the data from the corresponding MDX file in the page source code.
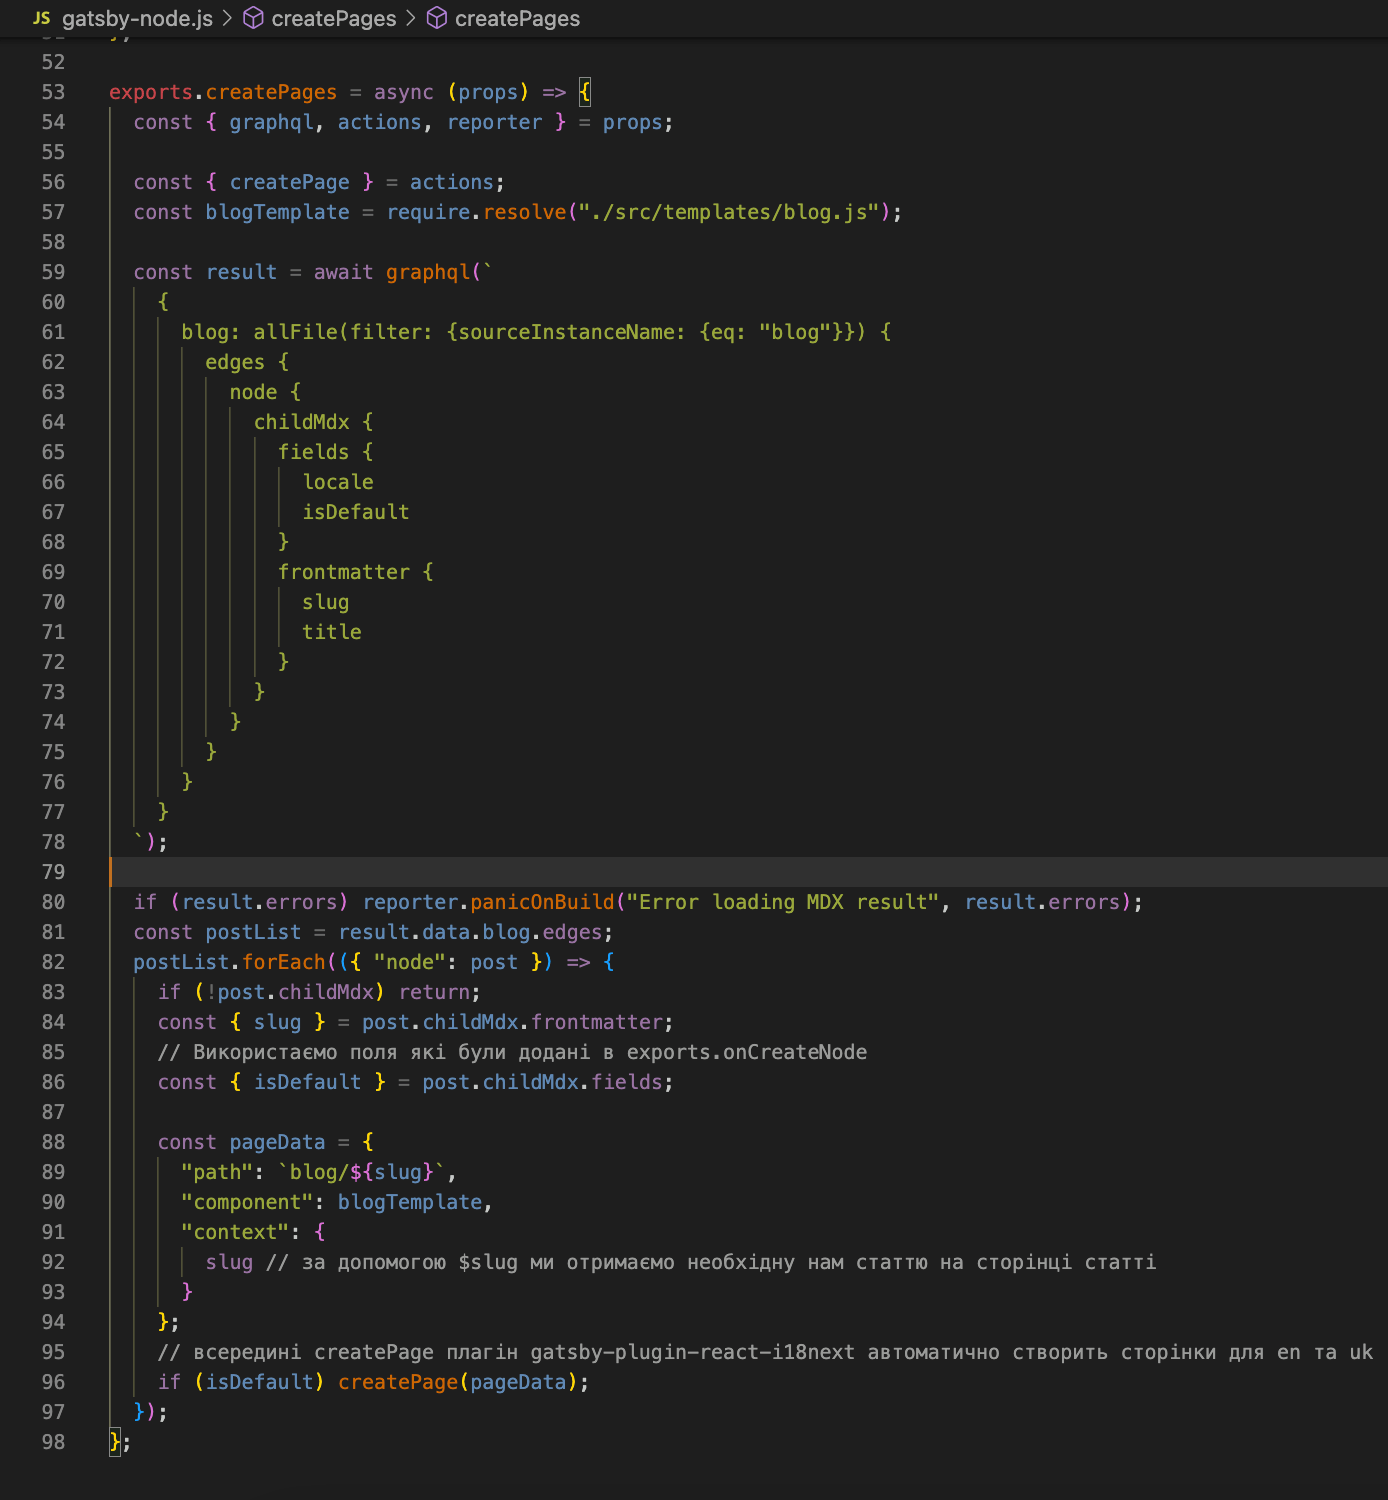
In line 57, the blogTemplate component is imported from the templates directory. The createPage function needs to know which template to use for page creation.
We've made a separate template for one article page in case that page's template is different (for now, this template will be identical to the other pages' templates). To make the createPage function work, let's create the src/templates directory and the blog.js file.
The article page template file (scr/templates/blog.js):
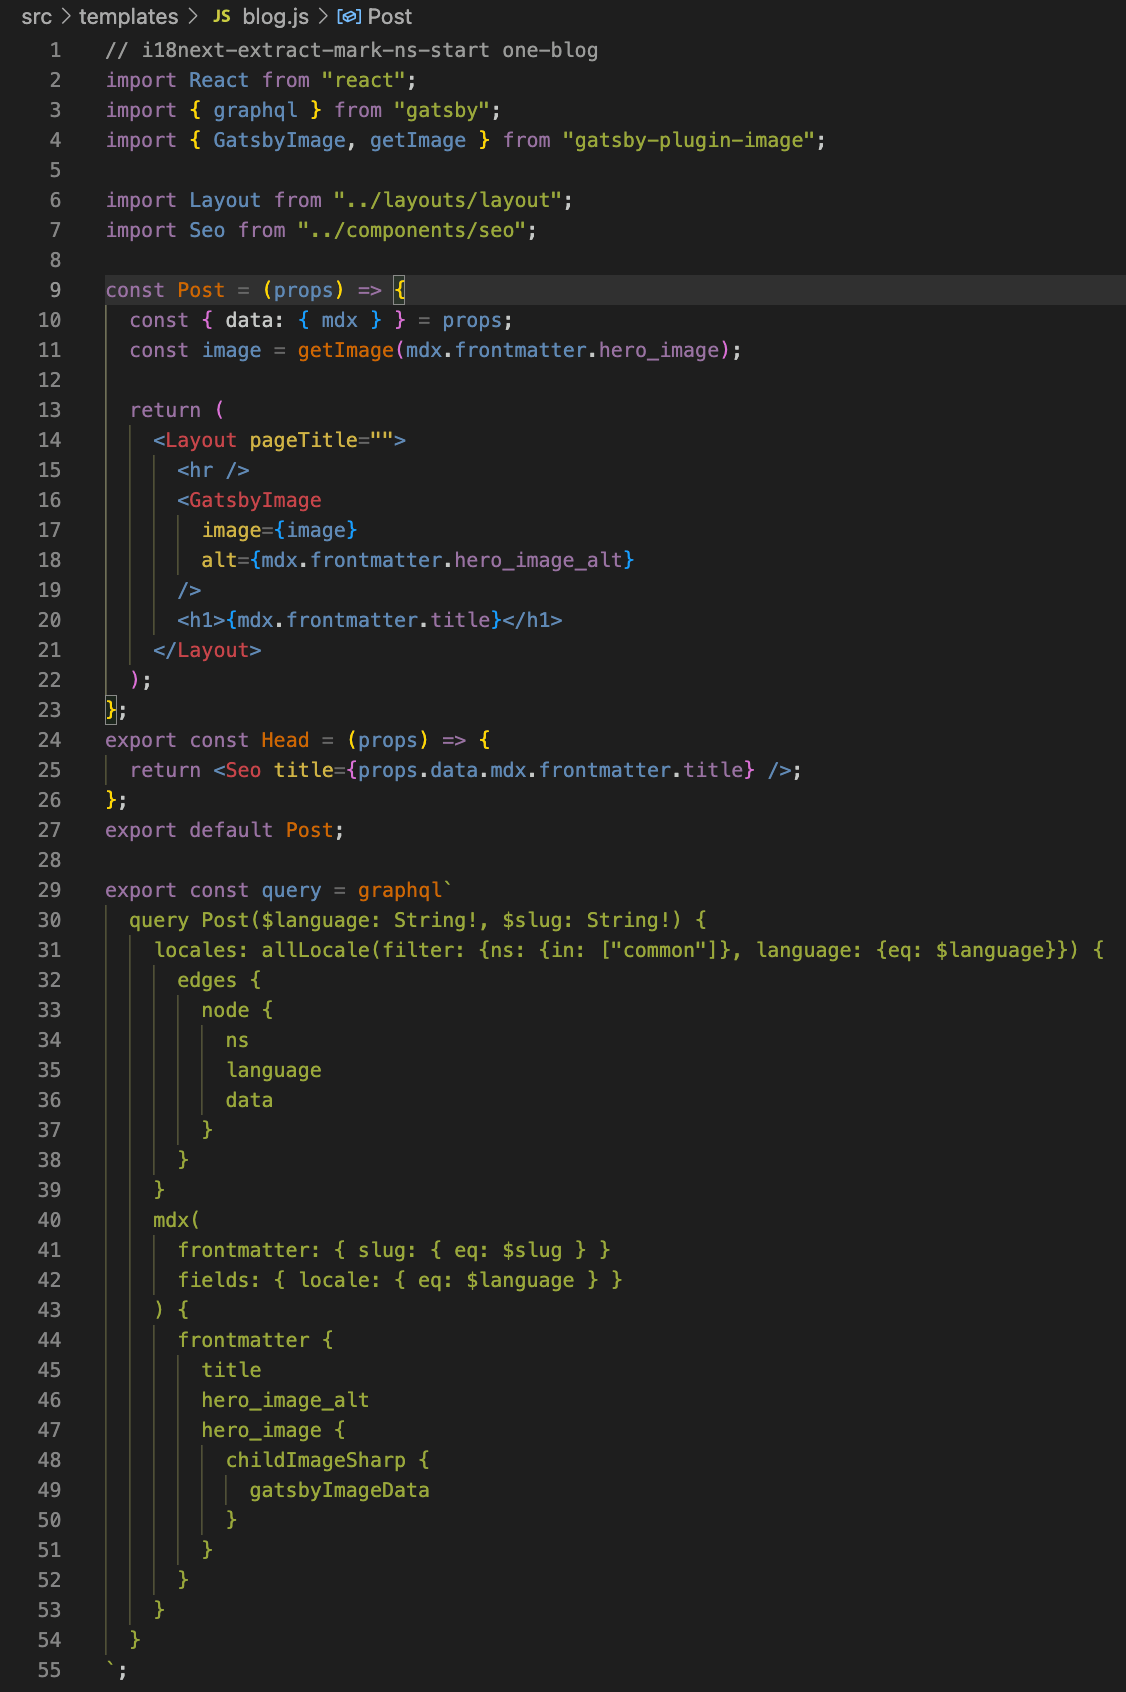
In the GraphQL query, we form the data structure on this page: locales — translations (namespace) for the page (here is only the common namespace for the navigation menu) and MDX — the data structure of the article from the .mdx file.
Finally, let`s display the content of the .mdx article file on the page.
Displaying the contents of .mdx files on article pages
Until now, we have used only the metadata .mdx of the articles` files we received in the page files. All such metadata is contained in the frontmatter object. We described this field using a GraphQL query in the following files src/pages/blog.js and src/templates/blog.js:

Frontmatter fields are easy to add and remove at the top of the file between the ——— ——— characters for each .mdx file.
File blog/first—post/index.mdx:
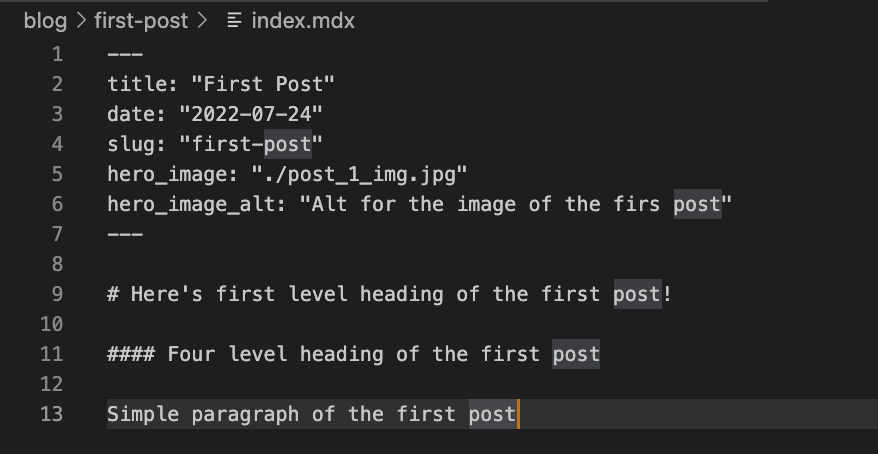
In other words, all the variables between the triple characters ——— can be retrieved on the page in the frontmatter object using a GraphQL query. Also, we still need to display the article's content in the .mdx file outside the triple ——— characters.
It is necessary to install additional npm packages so that the contents of the .mdx file are displayed correctly on the page.
# install npm packages
npm install react—markdown
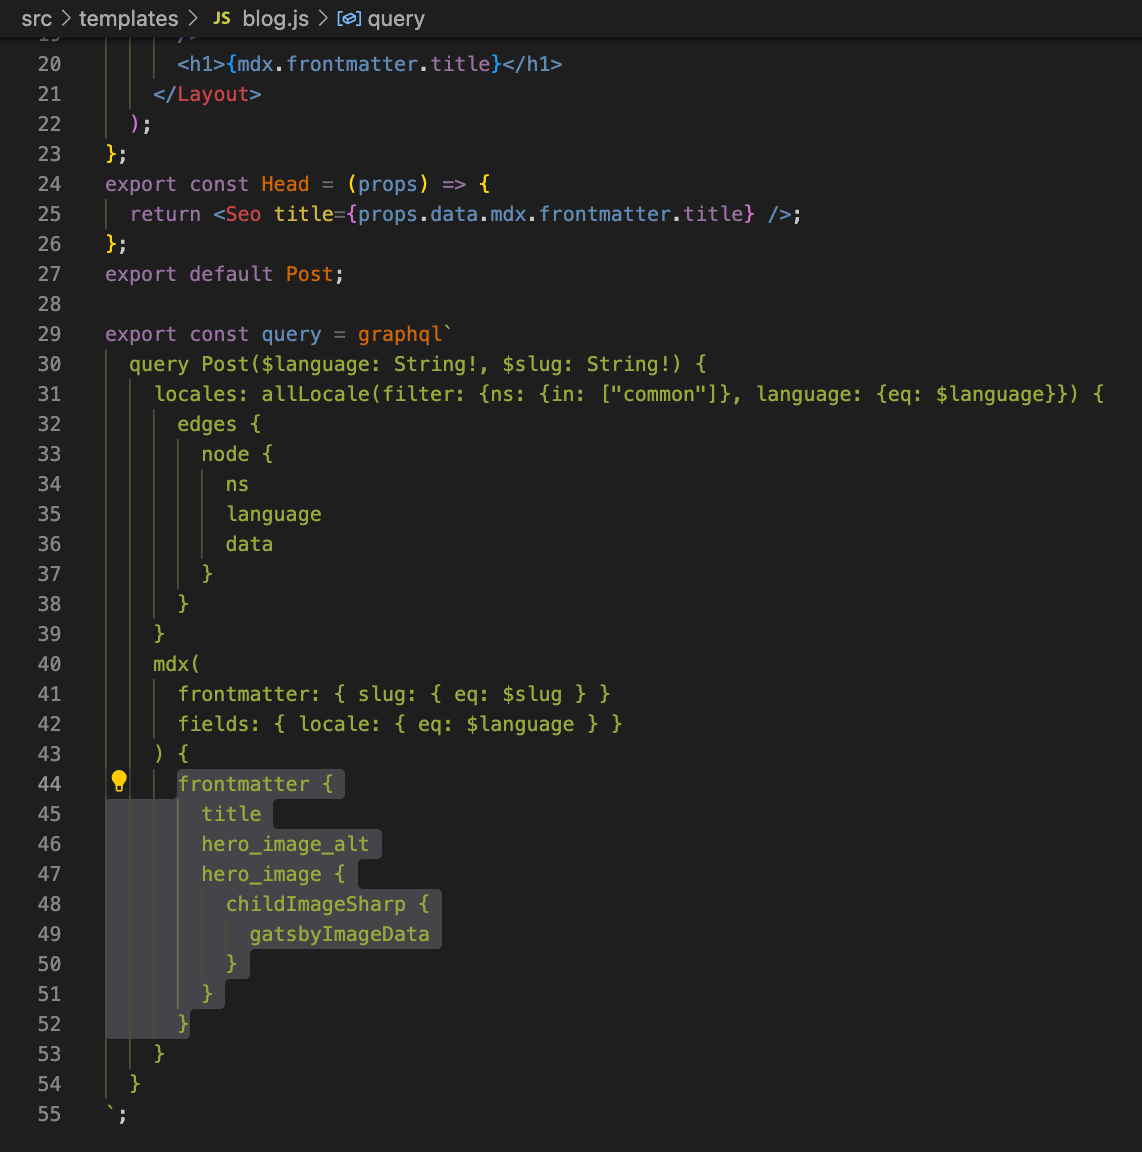
Next, go to scr/templates/blog.js, import ReactMarkdown from this package, and make more changes to this file. To get the contents of the .mdx file, change the GraphQL query for this page, i.e., add the body field:
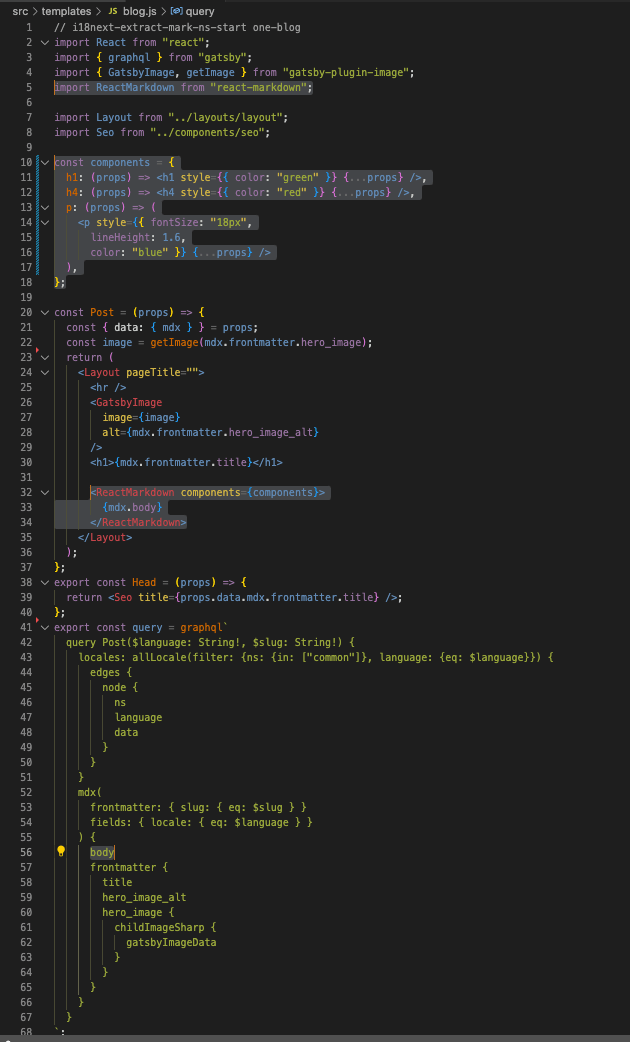
MDXProvider allows you to display the contents of .mdx files on pages correctly since .mdx differs in syntax from standard HTML markup.
Without using MDXProvider, the content of the MDX file will be recognized as plain text. In other words, MDXProvider converts markup from MDX files into JSX markup. At the same time, you can transfer an object with JSX components to the MDXProvider — components that will replace the corresponding tags from the markup of MDX files in the resulting JSX markup.
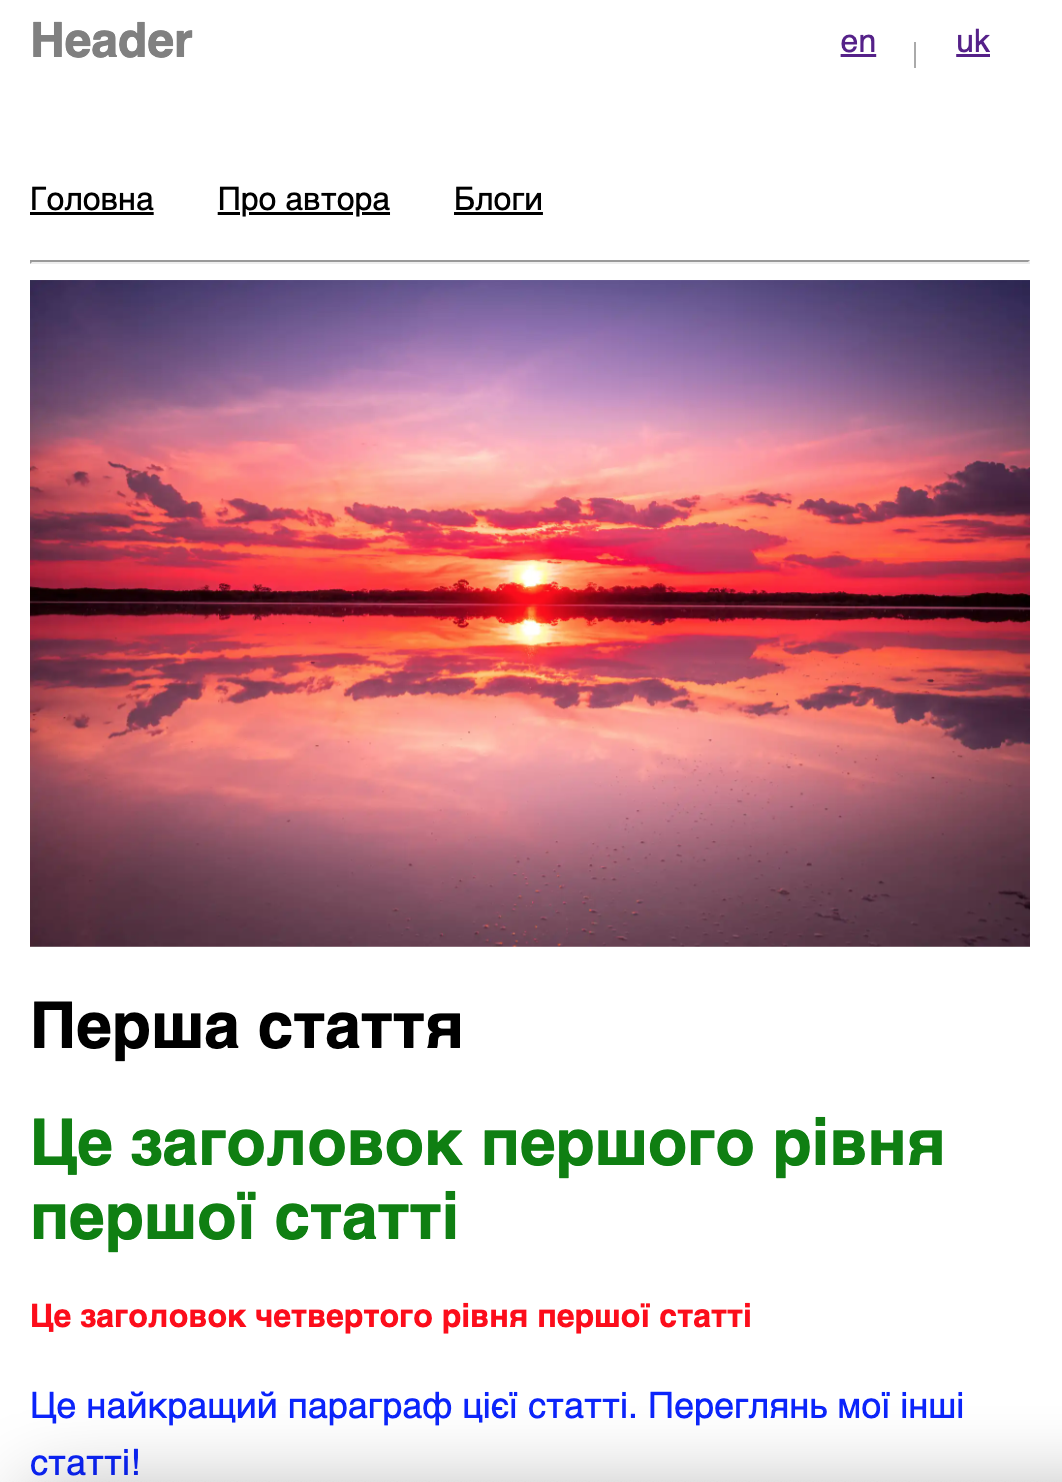
After making changes and running the project, we can switch languages on both the list and the one-article pages. You can see it on your own by visiting the article's page:
Conclusions
Adapting a site for multiple countries' usage can be challenging. Implementing multilingualism is an essential part of development. Understanding the main stages of this process will help you choose the optimal approach.
This article analyzed how to implement translations in the Gatsby project for static phrases from javascript files and content from .mdx files (content described using Markdown markup).
We also considered how generating JSON files for static phrases from js files could be facilitated by auto-generating such JSON files and dividing phrases into parts (namespaces).
As a result, we received fully translated Gatsby project pages into two languages (English and Ukrainian) and displayed content from .mdx files (articles) according to the language selected by the user.
Have an outstanding idea? Let's engineer your breakthrough! Contact us ➡️


Let's engineer your breakthrough

79015, Smal-Stotskoho St. 1 Ukraine
50-062, Plac Solny 15 Poland


